Showing posts with label Singer 201. Show all posts

Sunday, June 14, 2020

Refinishing a Singer 201 Cabinet

This cabinet and the Singer 201-2 machine inside were a birthday present to myself in 2017. On February 12th, for $63, I picked up this present at an estate sale about a mile away from home. T came with me at the end of the sale to help carry the cabinet and machine out to the car.
Cabinet on the way to the car
Veneer was faded from sun and worn around the edges where a mat had sat on the top
This is the Singer Art Deco cabinet #42. It was made for 15-90's, 15-91's, 201-2's, and 301-1's.
Set up at home to see if the machine works
I used the machine and cabinet for a couple years before I had time and the perfect weather to tackle the refinishing project outside. A couple weeks ago, T helped me carry the cabinet out to the patio then Dad took off the hardware and we sanded down the entire cabinet and stool.
Removing hinges and extensions
Using two palm sanders and a few sheets of sand paper, we got off most of the darker stain on the drawer pulls and the trim around the bottom two inches of the table and the stool.
Table and bench got sanded
All sanded
This table had been sitting in a back sunroom at its previous house. Even after it was sanded, you could see a line in the wood from years of sunlight exposure.
Sun exposure line didn't sand out
Originally, I had planned to keep the light wood color and just use a clear coat of polyurethane. A couple people pointed out though that most of the wood in my house, both in trim and furniture, is not this light. At the hardware store, I ended up picking out a red mahogany stain.
Red mahogany stain
All the staining and drying was done on the back patio and then the pieces stayed in the garage between applications. The stain did not not cover evenly on all pieces, but I am glad that I went with the darker color.
Each piece gets stained
After the polyurethane dried, all the pieces were brought back into the house and the table was reassembled. Things went together quickly, but I was left with two metal pieces and a spring when I was done. Had to study a pic of the cabinet online to figure out where those extra pieces went. The picture also showed me that I only had three of the four pieces I needed. Fortunately, I had seen the missing second spring when I was power-washing the patio a couple days earlier. Not knowing what it belonged to at the time, I had set it aside in a flower planter and was able to retrieve it quickly when I identified its intended placement. All four pieces fit under the back left hinge to support the extension when it was closed.
Reassembled
The stool cushion will need to be changed soon
Back of desk, sun line is less noticeable
The 201 machine in the cabinet went with me to Ray's in the summer of 2017 and got a complete cleaning and rewiring so it should be good to sew for quite awhile. This machine has been my preferred buttonholer for the last couple years.

Ready to sew

Sunday, December 4, 2016

Singer 201 Update and Questions

In hindsight, I probably should have suspected that there would be problems.  The Singer 201 I photographed a couple weeks ago did show some rust, had a frozen hand wheel, needed new wiring, and was missing a foot control and plug, but I still thought she could be cleaned up and doctored a bit and would be sewing again soon.  I had high hopes.
My first clue should have been the rust on the potted motor casing.  I knew I was going to have to clean the motor, but I was ready to take that on.  As I began to take apart the machine I used The Vintage Singer Sewing Machines Blog's series on How to Rewire a Potted Motor as a reference.  This is an amazing collection of pictures, videos, explanations and sequential postings that completely documents the process.  Rain has produced a top-notch series here and his responses to questions posted by readers demonstrate such clarity and depth of understanding.  Thank you, Rain, for such a thorough resource.
Rust on the motor casing: should have been a clue
I started by accessing the motor leads in the terminal body.  This machine did not have a plug, so I did not have to worry about unplugging the power source first.  Some of the wire coverings were dry and cracked and they need to be replaced, but there was no sign of moisture and it was easy to disconnect the motor leads.
Everything looked dry--nothing beyond repair, yet
Next, I removed the handwheel so I could access the motor housing. 
The handwheel came off easily, but was clearly going to need a good cleaning
The motor housing after handwheel was removed
The motor housing needs a good cleaning to get out the old grease, but this still seems a doable task.  I should have probably paid a bit more attention the the rust on the motor at the side of this pic.  After cleaning out the housing, I removed it and the motor. 
Motor housing has been removed
Bobbin-winder comes with the housing
Next, I removed the grease wicks, retaining clips, and springs.  The clips and springs were set to soak in alcohol. 
Moving on, I tried to take out the motor brushes, but only the spring came out without the brush attached.  There was some buildup under the motor caps.  Things started to take a significant turn for the worse when I tried to unscrew the motor cover.  Those screws were rusted solid and had no intention of coming loose.  I mean, really, just getting those screws loose probably took me 20 minutes.  When I finally went to pry the cover off it also appeared rusted in place.  Rain has a great photo on his blog about what I was should have (was hoping) to see when I took off the cover. You can see the picture here.  This is what I found instead.
Game over
That's a lot of rust and crud.  I don't think she can be resurrected.  Going to have to let this one go. Just because I could though, I decided to keep dismantling the motor while I had it there.  I took out the worm and that seemed be in very good shape.  Then I took out the armature and that was in a sorry state.  I mean, can you even tell where the metal plates are that you are supposed to be able to use to hold the armature?  Now I've got a parts graveyard on my table.  If anyone needs retaining clips, springs, grease caps, etc. let me know.
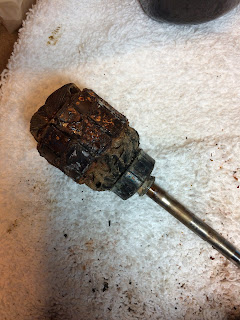
Armature caked in crud
Inside of the motor minus the armature
Ok, so this motor is not salvageable but I can still get the machine working, right?  What is my next step?  I know it needs new wiring and I have to get the handwheel unfrozen, but what options for power do I have?   Can I get a new motor or should I think about converting the machine to a treadle? I have never sewn on a Singer 201 and liked the idea of having a motor, but I don't know if that's possible at this point.  Any suggestions?


Saturday, November 26, 2016

Singer 201


Here's what the machine looked like on the first day she came to me. All the way from Dixon, Illinois, this machine came from the childhood home of a friend. No one had sewn on this machine in quite awhile, and it been in storage where it was exposed to water or humidity.  The decals are in good condition, but there is some worn paint and quite a bit of rust. The plug is missing from the power cord, the spool pin is bent, and the hand wheel is frozen in position. There is no foot controller or accessories. I looked up the identification number and it fits a 201 from 1941.  I had not seen a 201 before, and I was looking forward to seeing if I could get this one working.  The first step was using the air compressor to blow out years worth of lint, cobwebs, and rust.
Happy to be cobweb free

Water damage on the hand wheel and bobbin-winder?

Needle plate has two kinds of tape on it

Back view with the potted motor

Potted motor has water damage and spool pin is bent

Hand wheel does not turn

Decals look great

Needle bar does not move up and down
Now I will start taking things apart to clean and lubricate.  There is no way to plug this machine in  yet and the hand wheel is still frozen, but I have high hopes for this project.