Sunday, January 13, 2019

Great Grandmother's Gift, Guest Post from Linda


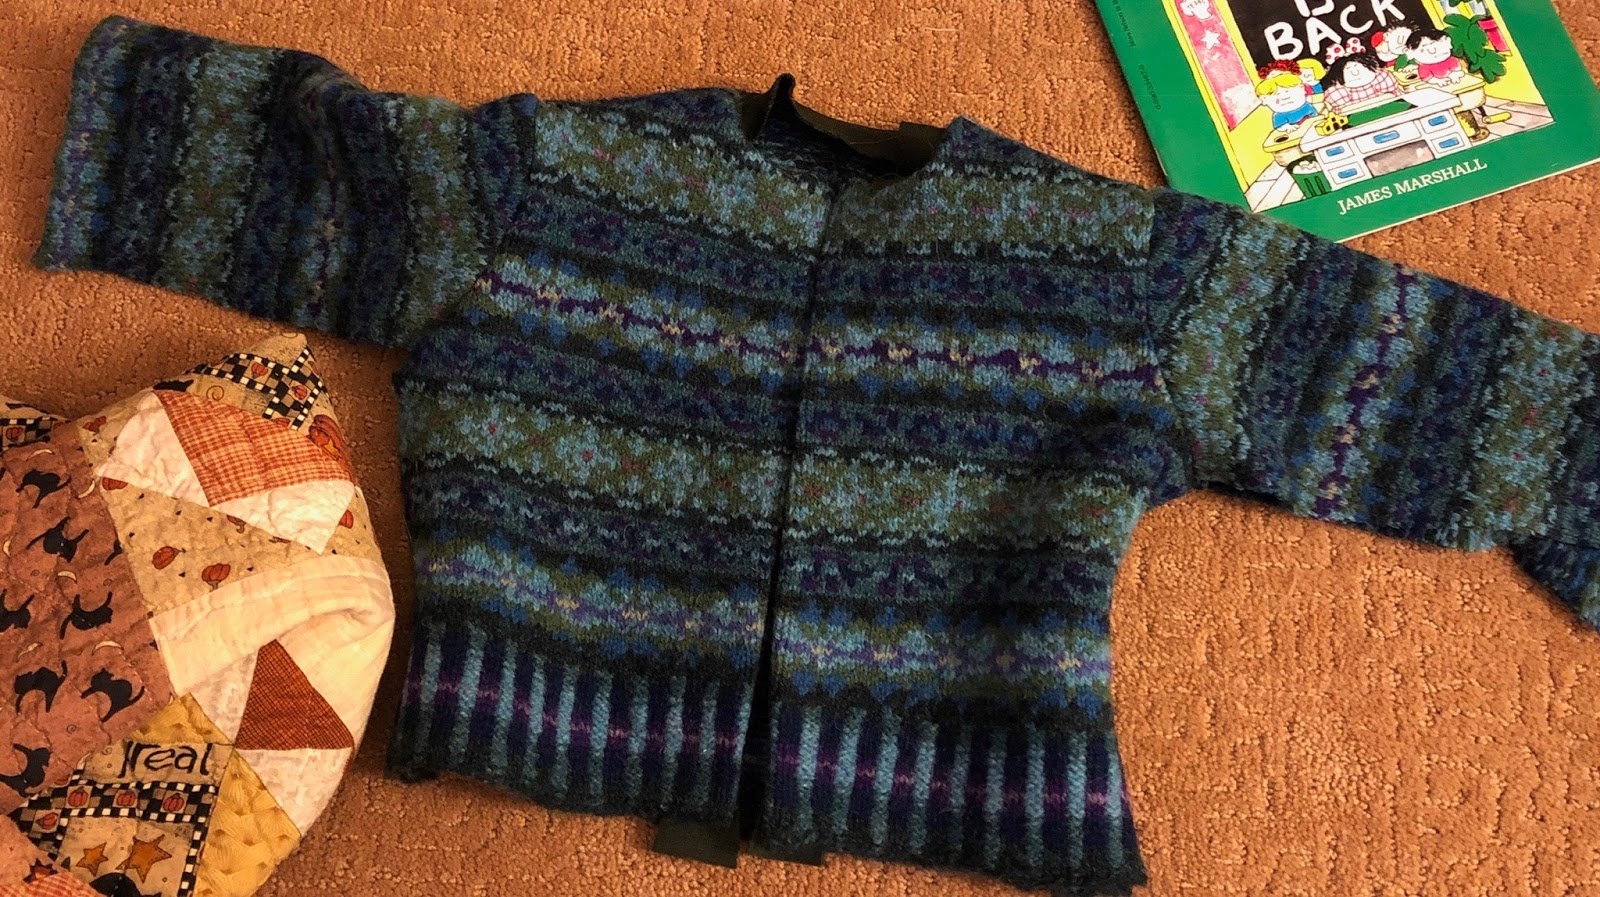
My mother knit as long as she could see and hold needles, but near the end of her life, she no longer had the skill. One of her unfinished projects was the "Hillswick Lumber" Fair Isle style cardigan, from Ann Feitelson's book The Art of Fair Isle Knitting. It was knit in the round, with a steek where the front opening would be. Mother made it a few rows past the armscye openings, and then set it aside. 
Sweater body before steek is cut
Mother died in September of 2018 at the age of 97. I don't keep many mementos, but this piece of knitting was special to me. I removed the needles and gently fulled the wool in warm water and Unicorn Fiber Wash. Butterick pattern 3782 has a very simple jacket that I've used before, and the simple lines seemed perfect for this knit. 
E's jacket is Butterick 3782 and made from her dad's worn out cotton knit sweater, embellished with simple hand embroidery.
I cut the fabric tube open at the front steek to evaluate yardage, and decided on a size medium. I could use the ribbing on the bottom of the sweater, but it seemed to overpower the sleeves. (Didn't have quite enough fabric anyway.)
Fabric laid out flat

Pattern pieces laid on fabric

Trimming off the front facing
I ended up cutting off the front facings. I needed to reduce bulk wherever possible, so I decided to make the front and neck facings out of wool knit ponte that I had in my stash. That gave me an extra seam, so I'm not positive it was the right choice, but the edges finished nicely inside. Iron-on knit interfacing stabilized the front openings and the shoulder seams. 
Fronts with facings ready to be attached
These two photos of the sweater insides will illustrate the difference between a sweater knit to fit and a sweater cut from a piece of fabric--seams and facings. The seams won't show when the sweater is being worn, and I don't think they will be irritating since the sweater is an outer garment. It wouldn't be my first choice if I were starting to knit a sweater, however. Far better to knit the pieces to fit and have no seam allowances and no raw edges to finish. 
This sweater has no inner seams
Seams visible in Fair Isle sweater
Not all of the pattern rows are perfect, because the patterns are tiny and Mother couldn't see well enough to always distinguish the colors. The discrepancies make the fabric all the more dear to me.
Closeup of pattern bands
Pattern bands across the front
Mother would be pleased to know all of her stitches on this project will go to warm one of her great grandchildren. It's just colored wool, but precious to this family.


Saturday, January 12, 2019

Winter Break Piecing


Over winter break this year, I did quite a bit of quilt piecing. I was trying to make a dent in my fabric stash and to make room for new fabric and projects. Variety in the patterns, fabrics, colors, and finished sizes made each one of these project interesting.  Here are 4 of the 5 tops I pieced.  Next up, a marathon session of basting so that these can get quilted some day.

Thursday, December 27, 2018

Lark Tees

Picture taken Christmas day
This shirt is based on the Lark Tee by Grainline Studio. I made a short-sleeve version of the shirt this summer using the original Lark Tee pattern to which I had added 2" inches to the length of the torso. I really liked how the scoop neck fit and how well the neckline finished. I was hoping to use this pattern as a TNT for t-shirts, but there were still some things that needed to be tweaked.
Early version of Lark Tee, scoop neckline looks good

I"m not a fan of the drag lines under arm and at side of bust
My second version was long-sleeved and I added 2 inches to the length of the sleeves as well. I don't have a picture, but while I was pleased with the sleeve length the the fit of the armscye and shoulders was still not ideal. I was still looking for a way to tackle the narrow shoulders and tight fit around the arms. When I visited my friend Megan in Iowa City in December she graciously made me a bodice sloper and I used that to modify my Lark Tee pattern. I made a small change to the slant of the shoulder seam and a significant adjustment to the armscye.
My most recently completed Lark Tee was finished two days before Christmas. The fabric came from Joann's and I had to get creative with how I cut the long sleeves as I didn't have enough to cut them in one piece.
Not tight under arms
View from back
Brooch stretches neckline a bit, but it will bounce back
I'm pretty happy with how the shirt fits now. I hope to get a few more versions made up in the near future.

Sunday, December 23, 2018

Birthday Bugs


These colorful bugs were made for my niece's birthday in November. E turned 4 and I was looking for a relatively quick project that I hadn't attempted before. Poking around online I found sewing projects for toys of all kinds. Taking inspiration from several sources, I decided to create a colorful bug menagerie. I drew some templates on index cards.  The circles were traced from various jar lids and the butterfly wings were freehand.

Gave myself basic patterns
The underside of the bugs are single pieces cut from an upholstery remnant. This gave me a solid piece to sew the front layers to and it made all of the bottom sides of the bugs very smooth and soft.
Fabric for bug bottoms
The top layers of the bugs were cut out of scraps pulled from the collection. Some of these pieces were pretty small and it was a good way to use them up.
Mixing and matching for a variety of bugs
Layers of fabric were sewn onto the backing with a zig-zag stitches in a range of thread colors.
Edges were not finished, but upholstery fabric will not fray
Eyes, mouths, antennae, and legs were added by hand and were made from various found objects.
Snaps, beads, metallic thread, raffia ribbon add details

He's got legs
For the butterfly, I tried out a few rarely used stitches on my Bernina 1230 and used up some thread spools of various colors. 
Only one butterfly
All the bugs were tucked into an envelope and mailed to my niece. My sister said E named them all when she opened the envelope. I don't know if they'll remain an interesting toy, but they were fun for me to make.
Who let the bugs out?


Monday, December 17, 2018

Sew Frosting, Tamarack Jacket


In October this year, Kelli from True Bias and Heather Lou from Closet Case Patterns hosted a sewing challenge that ended in December. They encouraged participants to sew their own frosting by venturing outside your comfort zone to try a new technique, pattern, or fabric. Take on a project that you tackle for fun, not for practicality.
I had finished my Tamarack Jacket muslin shortly before I learned of this challenge and I thought it would be fun use this pattern for some frosting. I also had some slippery black fabric with silver stars that would make for make a fantastic party jacket. The fabric came from Joann's and had been in my stash for about a year.
Back side of fabric is silver and very slippery
I cut a size 14 in the fashion fabric and then cut the lining from a combination of scraps. The back panel is corduroy and the front and sleeves are some stretchy black fabric of unknown origin. I didn't have a piece of corduroy large enough, so there is a seam about 6 inches up from the bottom.
Pieced to add length to jacket

Beautiful floral pattern gets turned to the inside of the lining and won't be visible
This time, the quilting was done on my Bernina 1230. Mom had tracked down a walking foot for each of her daughters' machines, and this was the trial run for mine. It worked smoothly and didn't snag any of the star fabric. I did have to pick out a seam one time after the fabric got folded under by mistake. The stitching came out easily though and did not leave a mark.
Fabric got folded over when I was quilting, had to take this out
I designed a starburst pattern for the back between the shoulders and then the lower back, sleeves, and front panels were rows spaced 3.5" apart.
Dividing the back into two sections
Creating starburst pattern between shoulders
I used green tape to mark the lines and it was easily repositionable on the fabric. After all the pieces were quilted, front and back panels were sewn together at the shoulder seams.

Attached at shoulder seams
The inside seams are finished with fabric scraps--corduroy, black stretch, and some fashion fabric. All of the bias binding is from the stars fashion fabric. The bias binding has iron on interfacing to help stabilize and minimize fraying. The silver threads in the stars did snag easily.

Iron-on interfacing for all of bias binding

Attaching bias binding

Inside of coat with bias binding
Here is the jacket with all bias binding complete. I love the sparkle!


The fabric is too delicate to withstand a purse or bag strap over my shoulder, and I knew the fabric would fray uncontrollably if I were to attempt adding pockets. I was even hesitant to add snaps to the front and eventually found buttons that could be attached away from the edge of the coat. The dark, seemingly mirrored, buttons came from Vogue fabrics. Buttonholes would have frayed the fabric in short order, so I opted for thread loops. When sewing the buttons on, I put another button behind each one to help keep the fabric from tearing or the button from pulling through. For the thread loops, I used the technique my friend Jane showed me at a Loose Ends meeting. The loops were made with regular sewing thread, but I may go back and reinforce with a thicker thread.
Buttons spaced 5 inches apart

Botton on back adds support to delicate fabric

Black and shiny fits well with the fabric

Stewie supervises sewing on buttons
Thread loops and buttons 
Finished coat all buttoned up
This jacket is definitely frosting. It is a lot of fun to wear, but too delicate for everyday use. For its first outing I was trying to figure out what to wear with it. The quilt batting makes it warmer than a sweater, but it's full on winter here now and the jacket is not warm enough for that. I tried pairing it with a long sleeve shirt, but was soon overheated. I ended up wearing it to work one day, unbuttoned over a short-sleeve t-shirt with jeans. The jacket definitely garnered compliments and I was comfortable in it all day. Photos were difficult to take with this shiny fabric. Often, there were spots on the fabric that looked blurry or like a solid spot of silver when the stars blended together.
Buttoning my jacket

Better fit, but still a bit too much fabric around the middle

Good length in the back
For now, I don't put the jacket in the closet because it don't want it to get snagged on a zipper, button, or another coat. It's showcased on the dress form in my sewing room and I can be inspired by it every time I walk past.

Sunday, December 16, 2018

Holiday Banner

This banner came together when I found myself looking for new holiday decorations that I didn't have to purchase. My fabric stash and overflowing fabric scrap bag provided everything I needed for the project.
Flags are a relatively neutral and will work for most holidays
The white and green polka-dot fabric was left over from the lime-teal quilt I finished this summer. Some of the letters were already made, and others were pieced from batting and fabrics in the scrap bag. The hem tape used for the ribbon has been in the drawer for years.
Hem tape holds all of the flags together
The flags are evenly spaced and attached to the hem tape,  but the letters for Merry Christmas are not permanently affixed. I wanted this banner to be adaptable for other holidays, so the letters are pinned from the backside of the flags. There are also extra flags so that letters and images could be swapped out over the course of a year.
Adding letters and hem tape
This project only took a couple of hours to complete and T helped me hang it from the picture rail in my sewing room.


Above the window

Above the built-in