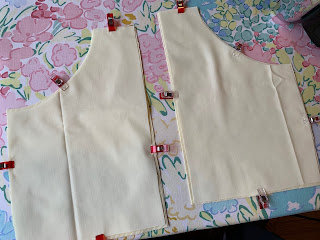
Thursday, May 28, 2020

Yellow Corduroy Lander Shorts


These shorts were so fun to make and I'm thrilled with how they turned out. I have used this pattern before, but this time I wanted to concentrate on fitting the waistband. My earlier attempts were mostly too loose and there was gaping in the back. I had also never actually put in the belt loops so I planned to give those a try.
Other than the pattern which I purchased  ago, I was able to pull all the pieces I needed for these shorts from my stash. The fabric is from Lillian, the pocket lining is from a lady in Wilmette who had me service her machine so that she could give it to mask makers, matching thread is from Cedar Rapids when I bought my Bernina 1230, the zipper and snap came from school as they are discontinuing the sewing classes, and the button is from my Aunt Janyce's collection. This was a fantastic example of making do with what you've got.
Fabric has faded areas and a couple stains
Pocket front top, pocket lining bottom
Shorts construction started with the pockets. For the back pockets I used the decorative flower stitch for a little whimsy. For the front pockets, no changes were made.
Matching pockets to lining 
Sewing pockets to lining
Topstitched pocket openings
Pockets attached to short fronts
Next, I worked on the invisible zipper. I tried to follow Kenneth King's tutorial on invisible zippers and while I'm happy with how it turned out, the zipper is definitely not invisible. I didn't have a yellow zipper and ended up using a tan one.
I liked King's process for inserting this zipper
For the belt loops, I accidentally cut twice as much fabric as it called for but this turned out to be a very good thing. It was so difficult to turn the loops right side out after they were sewn and I ended up having to sew up extra loops get enough useable ones.
Belt loops
For the waistband I used some iron-on interfacing that was designed specifically for waistbands. This interfacing was a bit stiffer than what I had before and it held a good shape.
Belt loops and waistband ready to be basted
To help minimize the gap between my lower back and the waistband, I put in a fish eye dart.
Fish eye dart
This fabric frayed non-stop. Every time I got up for sewing I was covered in yellow threads and fuzz. When I was hemming the shorts I decided to serge the edges first to minimize the unraveling. Then the hem was turned up 3/4" and secured with a zig-zag stitch. The button is decorative and there is a large snap underneath it. Both the snap and the button were sewn on by hand.
One-of-a-kind button
Back pockets a bit faded, but have small flower detail in stitching
Pictures were taken in the back yard on a very sunny day. I had been sitting for several hours already in the shorts as I wrapped up school work for the year. There are wrinkles and shadows in the pics, but that's a glimpse as to how the shorts wear in the 'wild.'
Let's see that button
From the back

Side view
Zipper is not invisible, but it works perfectly fine
I did take a couple action shots to show how the shorts move or sit as I'm moving.
No gaping when I sit down
I can bend over in the garden and not show my cheeks
Spring yellow complements the Clematis and the Lilac bush


Saturday, May 23, 2020

Striped Shirt

Smiling in the rain
 I made this shirt because I had a pattern and I had the fabric. I was trying out the pattern and the fabric wasn't something I would have chosen on my own, but it was in the stash. The bold colored stripes wouldn't have been my first pick and it's terry cloth so it reminded me of a towel.
There are no construction pics of this shirt and I didn't even take notes on what shirt pattern I was trying out. Geez, that was not well planned. Seams were done on the serger and the hem and sleeve hems were done with a zig-zag stitch on the Bernina 1120. I am pleased with how the neckband finished.
Neckband stripes are centered
Stripes matching on the side seam and rain on my arm
While sewing this project I kept thinking this would just be a putter around in the yard shirt, but the more times I wear it the more I like it. It already has a few snags in the fabric that I can't fix so it will never be a shirt that I wear to work, but it did get to go to the grocery store in the rain today. I was on my way home from the store when I realized I hadn't taken pics of this shirt because I didn't like it at the start. It was raining, but I pulled the car over near an empty school playground and propped the camera up in a garage window to take some shots with the timer. 
Turns out I'm wearing a pair of Lander Pants
Pants are too long for these boots so they got rolled up
Very comfy and will get worn often


Tuesday, May 5, 2020

Burda Style 6460 Blouse with Bow


Fabric is Liberty of London that I picked up at an estate sale in Kenilworth last summer. It is a cotton/wool blend 82%/18% and is hand wash only. The tag said there was 2 2/3 yd, but it was only 36" wide and there was no way to get sleeves cut. I ended up making a sleeveless version.
I cut a size 18 and graded out to 20 at the hips. Two inches were added to the length Next time, I could take some in through the lower back. The pattern is Burda Style 54600 view A and I think I picked it up at Joann Fabrics.

Buttons are a perfect color match
The buttons are from an antique store located in southern Illinois. I picked them up on the way to sewing machine repair camp in Missouri last summer.
There are no construction photos of this shirt, but I do remember having fun putting this shirt together and I don't remember any problems.

Added sweater with sleeves for work
I got to wear the shirt to work once before social distancing started and now it has been hanging in my closet for over a month. These pictures were taken after a couple cloudy and rainy days. It was wonderful to see the sun, but I found myself squinting in the brightness.
Enjoying the sun
I think I'd lengthen the tie a few inches next time
Added length means I will usually wear the shirt untucked
Had to practice tying a good bow
 

I have always enjoyed a paisley pattern

Friday, May 1, 2020

Bag Woven By Grandkids, Guest Post from Linda

Finished bag hanging from Necchi
Guest post by Courtney’s mother Linda

Children have an attraction to new and different tools, and big looms threaded with bright colors are a child magnet. Most of my looms are too big for a small person to handle. We made do sometimes with one child on one side of the loom throwing the shuttle to a sibling on the other side with me doing the treadling, but it was obvious to me that they needed a loom to fit. (It didn’t hurt that the little Schacht Wolf Pup was a loom I wanted anyway.)

Enter the four-shaft, six-treadle Wolf Pup. When this photo was taken, Oliver was six and Etta was four, and they could both manage to change the sheds and throw the shuttle themselves.

Etta and Oliver at the loom
When baby brother Finn was born, we decided to weave him a playmat. It would have to be three segments sewn together, because the width of the Wolf Pup is only around eighteen inches. I warped it with brightly colored 8/4 cotton and we used white cotton flake for the weft. Predictably, by the time the fabric was completely woven, Finn was walking and had no real need for a playmat. Cotton fabric is versatile—I thought it would make a useful tote bag. I have several bag patterns in my stash, this Simplicity one is from 1975.

Pattern Envelope
I sewed three segments together to make the body of the bag. Since the fabric was somewhat loosely woven, I interfaced it with an iron-on product.

Interfaced section on cutting table
The weave structure is a simple plain weave, but the irregularity of the cotton flake weft yarn combined with the shrinkage that occurs with cotton yarns when they are washed in hot water has yielded a lovely texture.
All the pieces cut
Most of the bag was sewn on my vintage Necchi BU Nova. Listening to that quiet and powerful motor is pure pleasure.
Green straps being sewn on the Necchi 
Here is the bag mostly constructed, just waiting for the side seams.

Constructed bag lying flat
I switched machines to sew the side seams. I wanted the stripes to match at the sides, and the walking foot on my Bernina 1130 keeps the top and bottom layers well matched.

Side seam sewn on Bernina 1130
The bag is lined with a pale yellow cotton, courtesy of my quilting stash. I don’t know what it will store—groceries, toys, beach items—but I hope it will be an incentive for more weaving!

Perfect pattern matching on the pocket