Friday, June 26, 2020

Mending Jeans

Yes, I was wearing these when they finally gave out. Fortunately, I was still at home and had just bent down to get something off the floor when I heard the rip. So much better to have that happen at home rather than at work or out and about. These jeans are probably ten or more years old and have been worn often. They are a bit tight these days and that adds stress on the fabric and the seams.
Hole in the crotch near the seat
Fabric is very thin around the hole
After having them sit on my dresser for almost a year, I finally sat down to get them mended. I used a piece of denim that was left over from some Lander pants I made last spring.
Basting the patch from inside the jeans
I started by trying on the jeans with the patch inside. Having the patch loose let me move it around to cover the hole and also to sit down a few times and see how the patch and jeans fabric would stretch. I used pins to hold the patch in place and took the jeans off to see how it looked inside. The patch did not lay flat when the jeans were laying on the table, but when they were on my body and curving over my rear the extra fabric let them stretch without stressing the original fabric too much. I basted the patch in by hand and checked the fit again.
The hole was then sewn on my Bernina 717 using forward and reverse lines in both horizontal and vertical directions. The top thread was a dark blue and the bottom threads were brown and green to finish off some bobbins. I then sewed around the outside of the patch where I had basted and secured  the patch to the seams on the jeans were that was possible. Once it was stitched down, I trimmed off the excess fabric on the patch.
Back of patch with edges trimmed
On the inside of the jeans, it looks like there is too much extra fabric in the patch. When I'm wearing the jeans though, the patch stretches out and fits well.
Finished patch from the inside
Finished patch from the outside
I think these jeans will need more patches in the coming years. There are a few other places where the fabric is getting worn thin. I'll keep the denim scraps close by so they will be ready to go when the need arises.


Sunday, June 21, 2020

Squares and Triangles Scrap Quilt

Hanging in the garden
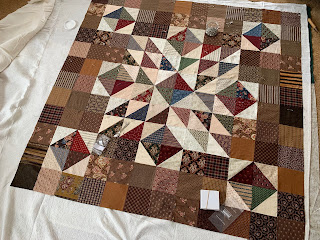
All of these fabrics are from mom's stash and most of them had been used in previous quilts. I was hoping to use up some fabrics that had been stored for years.
This was the original size, but I didn't want light colors in the corners
Decided to add one more row of squares as a border
There were actually some fabrics that got completely used up on this project. They didn't leave smaller scraps to be used in another project. It didn't make a noticeable dent in the stash, but a few pieces out means there's room to take in a few new fabrics.
December 2019, piecing finished
Over winter break, the quilt got basted and then it sat in my to-be-finished pile for a few months.
January 2020, backing added

In June, I had been doing mostly garment sewing and was looking for a quick non-clothing project. My Bernina 717 was ready to go from an earlier project and after deciding on the quilting style, I was off to the races.
This was about the biggest quilt that would fit in the harp space of the 717
The walking foot and seam guide made spacing out the rows of quilting very easy
Stewie checks the quilting from the back side before binding is finished
For the binding, I pieces a few of the scraps I had and this finished off a few more fabrics from the pile. It was sewn on using the Bernina 717 and then finished by hand.
Binding done, ready for the wash
Finished pictures were taken in the garden.
Washed and drying in the sunshine
Backing was pieced 
Finished size is 60" X 60"

Sunday, June 14, 2020

Refinishing a Singer 201 Cabinet

This cabinet and the Singer 201-2 machine inside were a birthday present to myself in 2017. On February 12th, for $63, I picked up this present at an estate sale about a mile away from home. T came with me at the end of the sale to help carry the cabinet and machine out to the car.
Cabinet on the way to the car
Veneer was faded from sun and worn around the edges where a mat had sat on the top
This is the Singer Art Deco cabinet #42. It was made for 15-90's, 15-91's, 201-2's, and 301-1's.
Set up at home to see if the machine works
I used the machine and cabinet for a couple years before I had time and the perfect weather to tackle the refinishing project outside. A couple weeks ago, T helped me carry the cabinet out to the patio then Dad took off the hardware and we sanded down the entire cabinet and stool.
Removing hinges and extensions
Using two palm sanders and a few sheets of sand paper, we got off most of the darker stain on the drawer pulls and the trim around the bottom two inches of the table and the stool.
Table and bench got sanded
All sanded
This table had been sitting in a back sunroom at its previous house. Even after it was sanded, you could see a line in the wood from years of sunlight exposure.
Sun exposure line didn't sand out
Originally, I had planned to keep the light wood color and just use a clear coat of polyurethane. A couple people pointed out though that most of the wood in my house, both in trim and furniture, is not this light. At the hardware store, I ended up picking out a red mahogany stain.
Red mahogany stain
All the staining and drying was done on the back patio and then the pieces stayed in the garage between applications. The stain did not not cover evenly on all pieces, but I am glad that I went with the darker color.
Each piece gets stained
After the polyurethane dried, all the pieces were brought back into the house and the table was reassembled. Things went together quickly, but I was left with two metal pieces and a spring when I was done. Had to study a pic of the cabinet online to figure out where those extra pieces went. The picture also showed me that I only had three of the four pieces I needed. Fortunately, I had seen the missing second spring when I was power-washing the patio a couple days earlier. Not knowing what it belonged to at the time, I had set it aside in a flower planter and was able to retrieve it quickly when I identified its intended placement. All four pieces fit under the back left hinge to support the extension when it was closed.
Reassembled
The stool cushion will need to be changed soon
Back of desk, sun line is less noticeable
The 201 machine in the cabinet went with me to Ray's in the summer of 2017 and got a complete cleaning and rewiring so it should be good to sew for quite awhile. This machine has been my preferred buttonholer for the last couple years.

Ready to sew

Thursday, June 11, 2020

Lander Shorts for the Garden

Lander shorts for the garden
Here is another pair of Lander Pant shorts. This time I omitted the belt loops and incorporated the button fly instead of the zipper. The fabric is an upholstery fabric for outdoor patio cushions. It's a remnant I picked up on Freecycle a couple years ago. It has so many colors from my garden and the fabric should be sturdy enough to last for quite some time. The pocket lining came from a neighbor who was downsizing her stash.
Short fabric and pocket lining
The floral pattern on the shorts does not seem to have a specific up or down direction so cutting didn't take very long at all. I was not trying to match the pattern on any seams and purposely cut the back pockets from different sections of the print.
Back pieces with darts
Pockets with lining
These shorts were sewn on my Bernina 1120 with a little serging help done on my Brother 1034D.
Having sewn this pattern up a few times now, I don't have to check the directions at every step, but I still had to read closely when it came to putting in the button fly. 
Alternate, smaller buttons
These are not the buttons that I had originally picked for the shorts. I used my Singer 201 to make the buttonholes and I did do a test run, but apparently I did not check that sample close enough and after I had finished 3 buttonholes I realized that the openings were too small for the buttons. Fortunately, I was able to find another set in my stash that worked well with the fabric. The buttonholes are done in a light green thread and then that same thread is used for the hem because I ran out of the yellow I had been using for the rest of the construction.

Hem was serged then folded under 3/4"
Photos were taken in the garden yesterday between rain showers. The lighting wasn't great and it was still sprinkling in some pictures. 
The big pockets in this pattern are a plus
Button spacing turned out well
Side view 
Back pockets don't match
Comfortable for weeding 
No gaping in the back waistband
Sitting on the front stoop
Fabric colors complement the garden