Friday, January 6, 2017

Spool Birds for My Niece


Baby on the way...

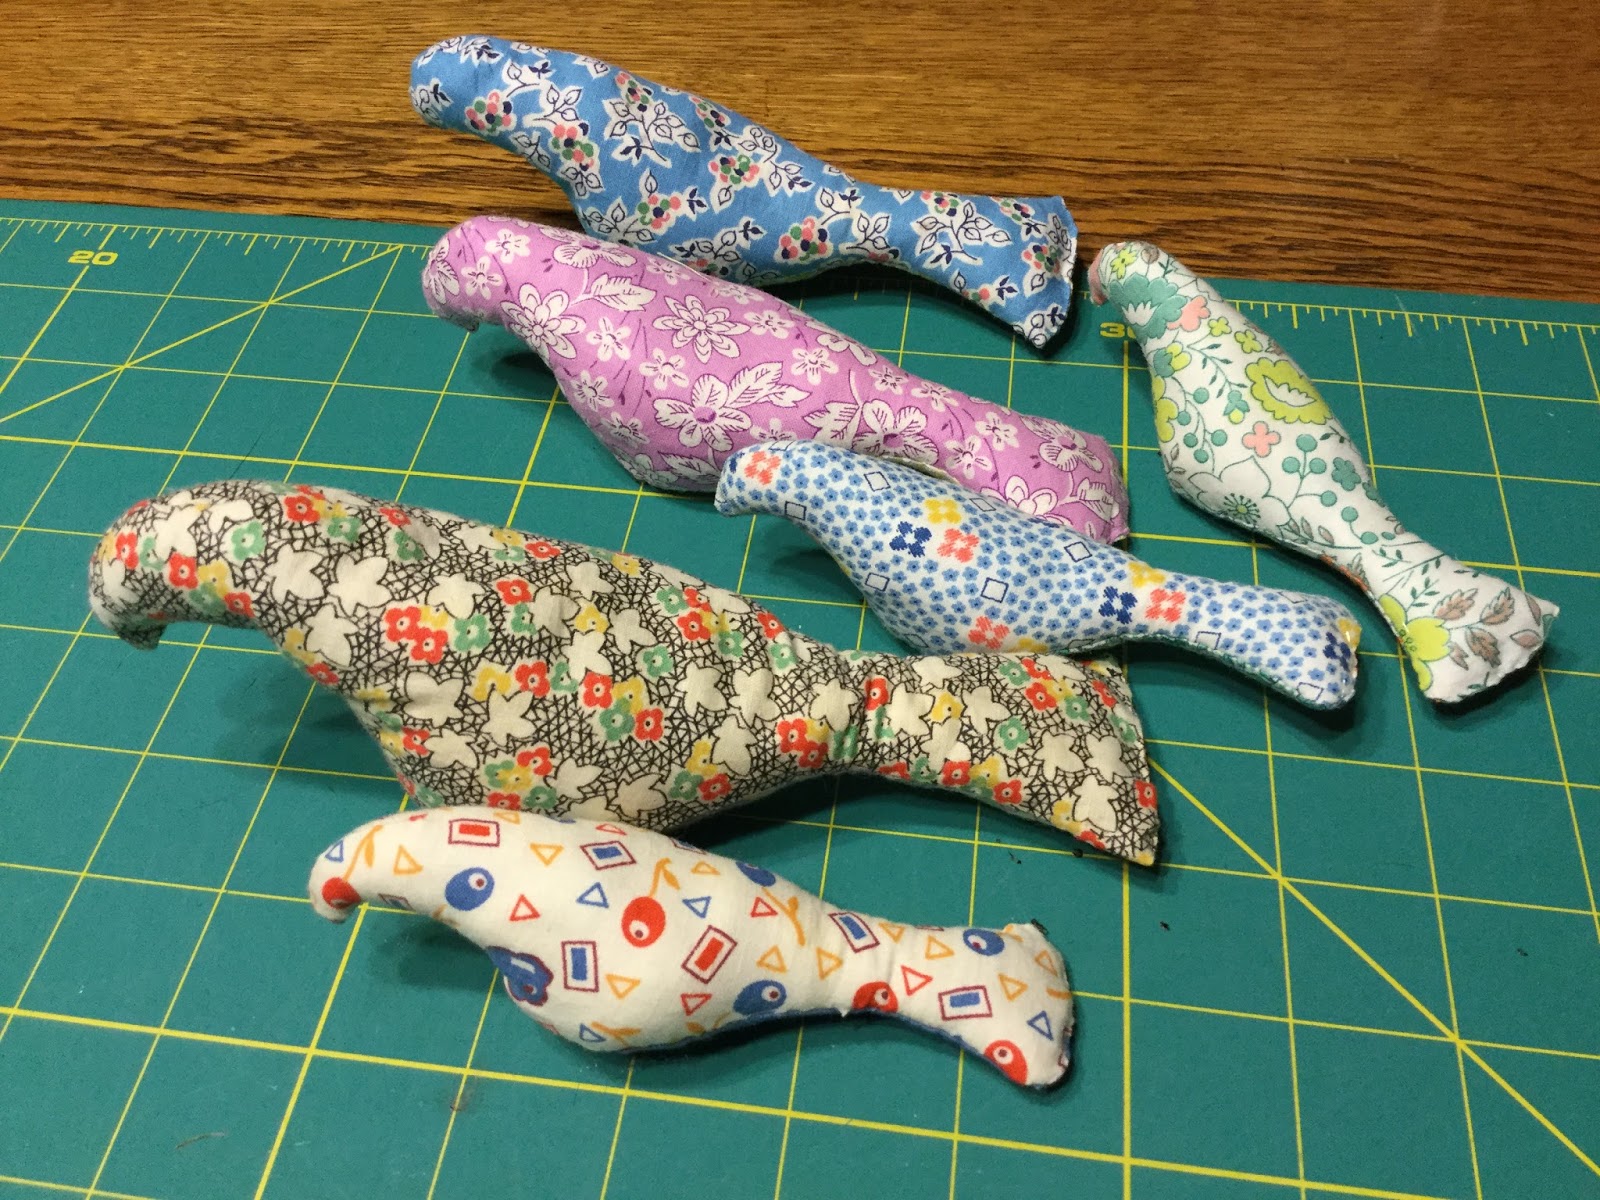
No, not to this house, to my sister's house in Minnesota.  My fourth niece is due to be born in February, and we're eager to meet this little one.  When I started thinking about my gift for the new baby, I tried to think outside the box.  I come from a family of talented quilters, knitters, weavers, and sewers so this baby will have no shortage of made-with-love items to welcome her home.  For my gift I wanted to challenge myself to try something new.  I was looking at ideas for nursery decorations, toys, and crib mobiles.  Several times I came across a version of a crib mobile or nursery decoration that incorporated birds and each time I liked the idea of working with birds.  The pattern I decided to use is for Spool Birds designed by Michael Fulkerson.  These birds were designed to be sewn by hand, and I thought it would be a nice break from machine sewing for awhile.  The fabric I decided to use was from an estate sale this summer--yay, I found perfect project for the vintage fabric!  I decided to make the birds in three sizes, and I started by printing out the pdf pattern.
Only 2 pieces per bird

I used nylon thread to make seams invisible
I decided to make eight total birds and that meant I didn't have to use any of the fabrics more than once. It really was delightful sewing these up.  I was picturing my niece looking at the fabrics and shapes in a few months as she lay in her bed. I chose not to put eyes on the birds, but I think the shape and fabrics are endearing as they are.
All of the seams get done except for the end of the tail and then the birds are flipped inside out and stuffed.  I put quilt batting in my birds, and I had a bit of supervision during this process.  Stewie yielded to the siren call of a warm and fluffy sleeping surface.
Yes, this quilt batting is good for snuggling
The final seam is put on the tail and then the birds, themselves, are finished.

The flock is growing
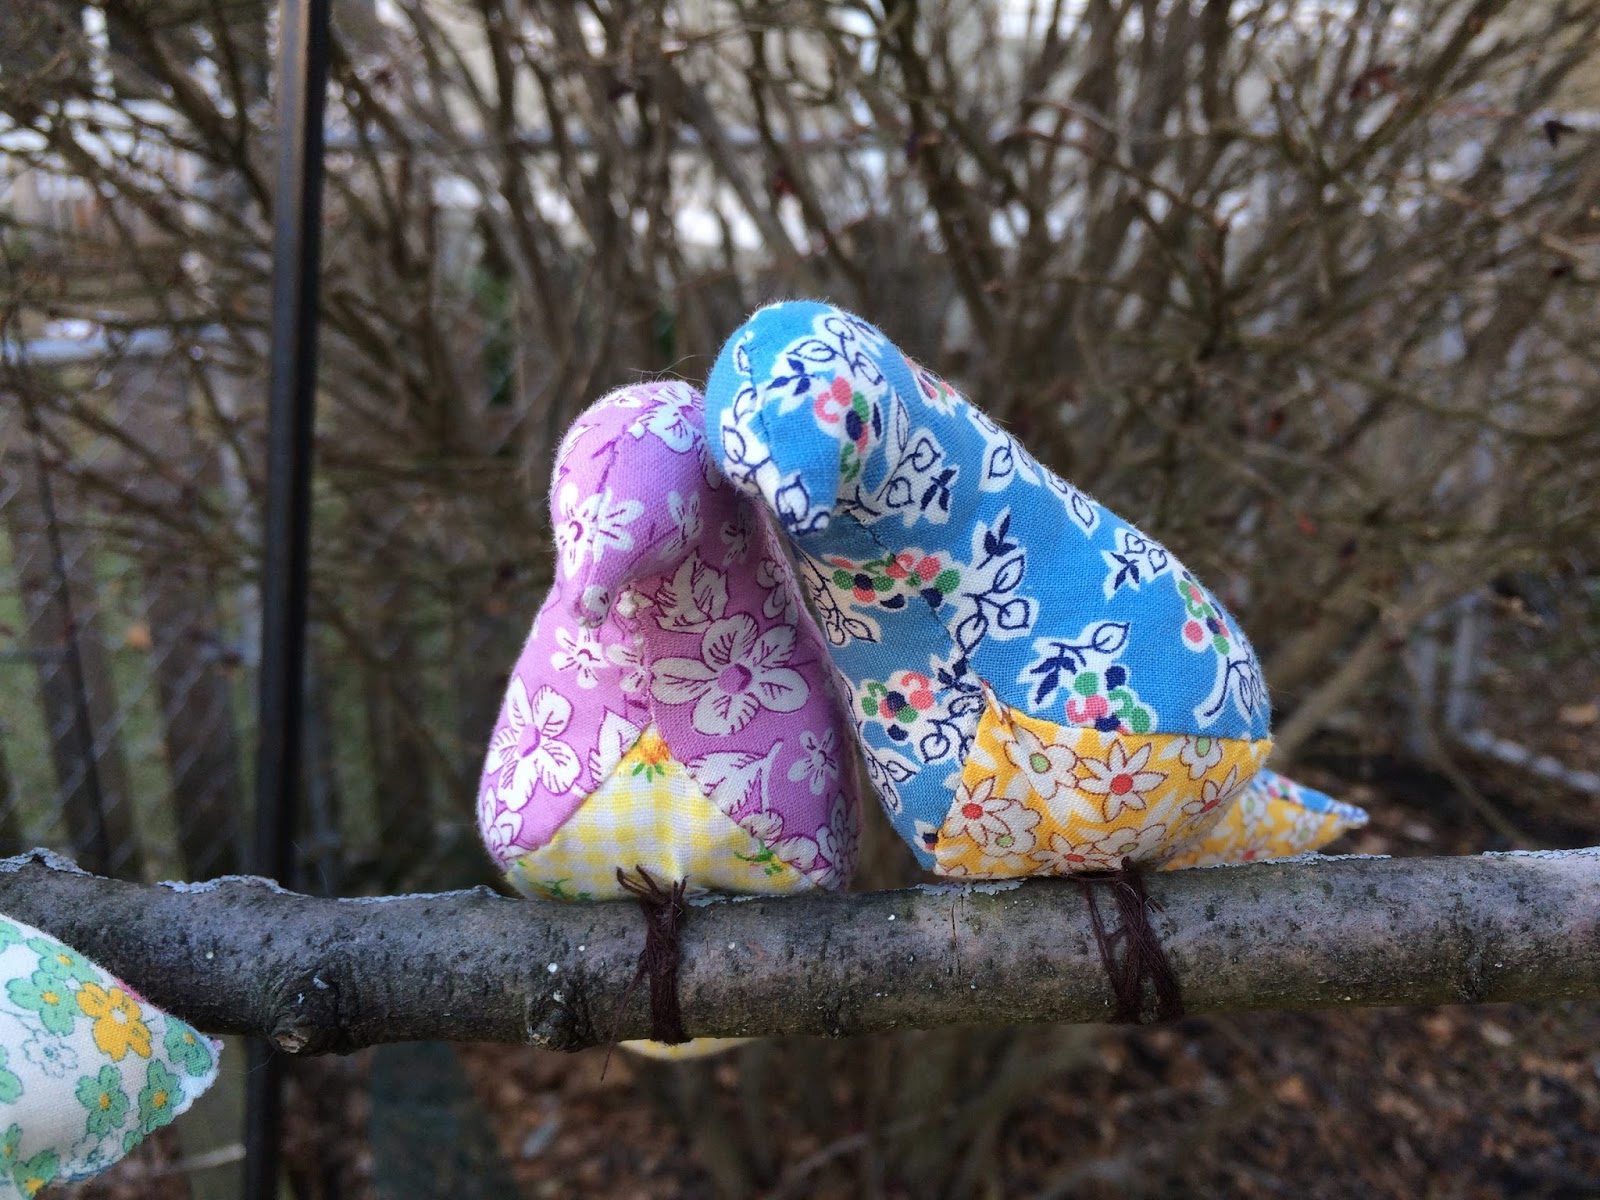
The birds were finished one day and then next day T and I went for a walk around the neighborhood in search of the perfect perching branch.  I carried home several possibilities and now we have a pile of second, third, and fourth choices in the back garden.  The chosen branch was hung from the dining room chandelier and then the birds flew up to secure their roosting positions.  There is a pair of love birds that chose to sit together, a group of chatterboxes meeting for a circle gab session, two kids hopping about on the various branch levels, and one lone bird singing to himself on the end.  The birds chose their spots and then I just secured them to the branch so they didn't have to worry about falling off.  When everyone was comfortable, we moved the branch out to the yard for a few pictures.
Here's the whole gang

Kids hopping on the left and the gab session on the right

Lovebirds
I have done a little reading about birds and it turns out they're good omens.  So, my dear niece, you'll have some powerful friends and protectors in your nursery. 

 "In fact, most things associated with birds tend to spell good fortune, such as when birds fly to your home and start making nests in and around your house. While bats bring abundance, birds bring good news and opportunities. The next time a flock of ravens, pigeons or magpies come to your home, feed them with bird seeds. Birds are also said to be powerful protectors and guardians."   WOFS.com

The birds travelled to Minnesota this week and hopefully, I'm posting this after my sister has seen the finished project. 

Saturday, December 31, 2016

Poodle Shirt

Here is my last post of the year.  Thank you to everyone who took time to read or comment on any of my posts this year.  This is still a very new-to-me adventure, but I am looking forward to growing my sewing and blogging skill sets in 2017.  Happy New Year to all!


It may be a bit too chilly to wear this shirt for the next couple of months, but I'll be pleased to have it hanging in my closet come spring. It's my second attempt at the McCall's 7247 top after I added a couple inches length in the torso.
Front view on dress form--this one is going to need a camisole
Side view

Back view
I know that the pattern calls for some sort of stretchy knit, but I didn't have any on hand.  Instead, I decided to use my poodle fabric that was waiting for the perfect project.  The poodles on this fabric are a bit stiff and seem to be painted or glued on the fabric, but are also fuzzy to the touch.

I don't know exactly what the fabric content is here, but it was basically trying to cut water with scissors.  I laid everything out on the kitchen floor and then spent a good while trying to pin my homemade paper patterns to basically air that kept slipping through my fingers.  It was so challenging, in fact, that I avoided sewing with it on a sewing machine and I decided to try sewing my first garment by hand.  There are no zippers or buttons, so this seemed like a good way to get my feet wet. I started by going back to one of the lovely resource books that I had picked up this fall when I purchased a serger.
 The book is Couture Sewing Techniques by Claire B. Shaeffer.  I know next-to-nothing about couture and I spent a couple hours reading through this book and studying pictures.  The descriptions for a wide range of couture techniques are given and there are diagrams illustrating the process as well as pictures of beautiful completed garments incorporating the techniques.  As a beginner, I chose to tryout the running stitch (to set in sleeves and as part of the hem), a french seam (for the side and shoulder seams) and a self-bound seam (for the neckline).  

I used gray silk thread that slid through the fabric effortlessly.  The poodles were a bit tricky to sew through at times, but it was nice to have something to anchor stitches to every few inches.
Shoulder seam with neckline on one side, sleeve seam on the other, and front flat in the middle
My seams need a lot of finessing for style, but I think they will sufficiently hold the material together. Let's pretend I was going for function over form.  Next time, I will try to finish the sleeve and neckline seam differently.  I do not like frayed edges as an end result.  
Neckline from the front.  
I do think the side seams turned out well.  The stitches are relatively small and regular and there are no frayed edges sticking out.
Side seam
From the side, I like the added length

From the back

Just watching the first snowfall of the year

Wednesday, December 28, 2016

Necchi BU Mira Update and First Project

I'm posting this update fast on the heels of my introduction for this machine.  I may have forgotten to actually post the intro a few months ago and just came across it when I started writing this update. Ah well, this will minimize any feelings of suspense you had about how this machine would turn out.
I started by cleaning the machine inside and out. I really wanted to get as much of the oil residue off as I could, and the chrome polished up nicely.  Next, I tackled the crumbling wires that attached to the motor.
Old wires
I took the motor bracket off the machine and then took the motor out of the bracket.
Wires coming up through bed of machine

White caulk extends around side of machine
The wires coming up through the bed of the machine had no insulation left on them.  There was a white putty substance that crumbled easily and then a line of white 'caulk' that went around the side of the machine.  All of the connections inside the box looked good, so I just planned to swap out the wires with crumbling insulation.

Take that gray wire out
A trip to the Goodwill for a power cord and to the hardware store for eyelets and then I was ready to go.  Once I got started, the process didn't take very long and I had a working motor upon completion.


From then on it was attention to detail that got this girl looking her absolute best. Here she is ready to take on her first quilting project.  I do not have a cabinet for her right now, but I will keep looking for one because she wandered a bit while sewing on this table.
She is beautiful!

There are a few marks on her paint, but she has aged well. 
Oil residue spots are minimized
After tension discs were cleaned, she threaded up easily

There is no crumbling insulation on that power cord

The needle plate has some rust that I couldn't get off, but it sanded to a pretty smooth surface

I took the wonder wheel off the machine for now.  I will need to replace the tire and find one missing part before I try it out.

The light works
 The first project I worked on with Mira was piecing a baby quilt.  This one was made from a jelly roll of Moda fabrics.
Assembly line piecing
Here is the finished top waiting for a backing
I loved sewing with this machine.  There was not one time that the thread or needle jammed up.  I was able to figure out the bobbin winder without the manual, and I like the sound the machine makes when it's working.  The machine feels like it has more power than was needed for this project and I'll have to figure out another way to put her through her paces.

Necchi BU Mira

This machine was a gift that I bought for myself while on a girls' weekend in Wisconsin.  My college roommate and I met in Milwaukee this summer for a couple days of fun.  We checked out the Schlitz Audubon Society, Havenwoods State Forest, and great restaurants.  J, what do you say, shall we do it again next summer?  On the first day I got to the hotel a bit early so I made a quick side trip down the street to the Goodwill.  There was only one machine in the whole place, but I was completely taken with it.  The machine was hidden in a broken cabinet in the back of the store surrounded by furniture and buried under some boxes.  I almost walked right by it, but the type of legs on the cabinet spurred me to take a closer look.  Inside the cabinet I found the discolored and somewhat worn BU Mira. The hand wheel would barely turn, but the wiring was crumbling and I didn't want to plug it in to try it out. Near the hand wheel was an attachment that I did not recognize and I guessed it was a wonder wheel. There was a small box of accessories and three discs for the wonder wheel in the door of the cabinet, and I practically ran up to the counter to purchase all of it.  I spent the next few days hauling a sewing machine and cabinet in the back of my car everywhere we went.  I was tempted to carry it into the hotel one night so I could look at it, but my friend gave me the 'you might be a bit too crazy' look, so the machine stayed in my car until I got back to Chicago.
When I finally got home, I took the machine out of the crumbling cabinet and threw the cabinet away.
The lighting is a bit dark in the garage

Top view: Lots of oil residue discoloring the paint

The bed looks to be in pretty good condition
  The tire for the wonder wheel and the bobbin winder need to be replaced

The belt looks to be in good shape

There a good collection of lint and such behind the faceplate

Handy panel for access to innards
You can see some wear on the side of the bed--maybe from the cabinet

Oil ports keep out dust, but have accumulated a residue around them over time

Some paint worn off on the bed and body

I did not get a manual with this machine, so I had to go online and do a bit of reading before I started cleaning her up.  This machine is from the early 1950's.  The Mira is a top-of-the-line Necchi and it will sew straight stitch, zig-zag, and reverse.  The wonder wheel allows the machine to do a few decorative stitches, but I don't think that I have all the pieces for this wheel right now.  The motor has two speeds, high and low, with a switch on the back.  There is also a built-in light. Since the wiring is crumbling, I did not try to see if the light works. The box of accessories came with a few class 15 bobbins, two needle plates, several different feet, an automatic threader, and what I am hoping are the wonder wheel rods. 
The plan was to have this machine working by Christmas.

Friday, December 23, 2016

Crushed Red Velvet Shirt

Just in time for the holiday, I finished my red velvet shirt.  I started with the pattern from my 70's vibe dress and just shortened it about 4 inches.  Now I'm thinking I should have added a couple more inches to the arm length and lowered the neckline a bit, but overall I'm pleased with how it turned out.  The fabric was another Salvation Army scrap.  The shoulder and side seams were done on my Necchi Supernova Ultra Mark II and the hem, neckline, and sleeve finishes were done by hand. Cutting the fabric was very messy, but the pieces then went together very quickly.  The fabric is a bit stretchy, so it was forgiving with some of my errant hem stitches.
I wore the shirt to work yesterday and then out to dinner afterwards.  These pictures were snapped quickly near our table while we waited for our food.  The lighting is terrible and I put very little forethought into picture composition, but here are a couple pics to show the finished shirt.
Festive red
Front neckline is a bit high


Contemplating the next project