Saturday, February 24, 2018

Fresh Look for the Front Porch

Shortly after moving in 2008
The porch furniture came with the house. We had asked the seller to leave the set because we weren't bringing any of our own. We have since changed the arrangement, but the chairs, tables, and ottomans are still in good shape today.  I made covers for all of the pillows and cushions in 2009.  
No cover (left) with cover (right)
This past summer, we decided the pillow and seat cushion covers needed to be replaced. They were faded from sun exposure, torn from cat claws, and had several food stains on them. The seat cushions had also lost all support and were not comfortable to sit in for more than 5 minutes. T ordered two new foam cushions for the larger chairs. The fabric for new covers was purchased on sale this summer, but I knew that I wouldn't start working on this project until the short winter days kept me inside. The last weekend in January, I started making the green welting that would go on all the cushions and pillows. Originally, I had planned to use my Singer 201-2, but I don't have a working zipper foot for it. Maybe I'll find one this summer? I tried my Necchi Supernova and that worked great. Once the welting was finished I took apart the old pillow covers and used the pieces as patterns for new covers. I also took the zippers out of the old pillows to reuse them when possible. I ended up only having to install one new zipper. Twice, I underestimated how much welting I would need and after one trip back to the store to buy more, I decided to reuse some from the original pillows to finish up the last pillow.  

I had help attaching the welting
The four seat cushions all got zippers sewn into the backs so that the covers could be removed for cleaning. The four back pillow covers are not removable. Zippers were inserted into the side pieces first and then the tops and bottoms were clipped to the sides with the welting sandwiched in-between.
When I tried to sew through four layers of fabric on the Necchi, it balked three times.  After replacing 3 needles, I moved over to my Pfaff 131 and used the zipper foot on there.  It was a bit difficult to maneuver all the fabric within the limited harp space, but I didn't have any broken needles. It sewed right through the multiple fabric layers and even two layers of welting that overlapped in the back.
Pillow covers without zippers were finished by hand after the pillows were inserted
 After arranging the pillows on the porch and taking a picture, I realized that I would need to redo one of the seat cushions. I had inserted the zipper on the front side of one cushion instead of the back side. Since the cushions are rounded in the back and a bit wider across the front, I could not just turn it around.
The pattern almost camouflages the errant zipper, right?
Today, I picked up my seam ripper and took the top and bottom off the cushion. The pieces were repositioned and then I sewed them back together again using the Pfaff 131.
Hopefully, it goes back together
A new bulb on my machine made visibility noticeably better


And now everything is finished
 Come on over for a little porch sitting any time you're in the neighborhood!

Sunday, February 4, 2018

Quilt of Many Squares

Orange, turquoise, mauve, black, coral, lime, blue, olive, gray, tan...
The fabric was purchased with plans for a quilt for my sister, but the longer it sat around in my sewing room the less likely it was that she would get the finished product. The pattern is from one of Kaffe Fassett's books and I made a smaller version of it once before for a baby quilt that I gifted years ago. I remembered how small some of the pieces were on this quilt and how much time went into its construction--that convinced me that I wanted one of my own to keep. Most of the fabric is from a jelly roll that I purchased and I think there are scraps from only three or four non-roll fabrics incorporated. This is unusual for me, I like to put as many fabrics as possible into any quilt and the more scraps the better. Since these were not colors and patterns I have worked with before though, I really didn't have scraps laying around to expand the tableau. All of the piecing was done on my Necchi Supernova.  So many seams, but it went together smoothly.
I started by making the larger squares first. I really didn't know if I had enough fabric and I didn't want to be piecing strips for the longer square sides. Tally marks were used to keep track of the finished squares pile.
Kaffe Fassett's name misspelled in my notes, I corrected it after this picture
Once all of the square were completed, I started building the quilt out from the middle.  In his book, Kaffe details how to work from the center out by adding a row or column and working counter-clockwise.

A couple segments in
Row added to the top

Left side and bottom completed
Wouldn't you know it, even with my careful tallying, I still ended up with an extra block.  I ended up embroidering the year on it and then using it as part of the pieced backing. After much deliberation, I chose a basketweave pattern for the quilting. It required a lot of starting and stopping and changing direction, but I used my Pfaff 131 and I absolutely love working on that machine.

For the binding I was hoping for a solid, but I had nothing suitable in my fabric stash. I checked mom's stash as well and surprisingly, she didn't have anything I wanted either. So, back to the fabric store. :)  There I found a fantastic orange and only needed 1/3 yd for the entire binding. Of course, while searching for orange, several other fabrics fairly jumped off the shelves into my open arms.  They needed a good home and I happily adopted them. What project will I use them in?
Some orange and a new project...
I sewed the binding on by machine and then finished the back by hand.
Lainie watched the hand stitching very closely
I use these clips for all types of projects, but they're particularly handy at holding binding
I had this partial spool of old thread sitting around, perfect color match, but would there be enough of it?
I finished the binding with about 3 inches of thread left to tie off. 
The sleeve on the back was a scrap and that was basted on by hand as well.

Here is a view of the back of the quilt. Backing was pieced from scraps and one leftover block.  I love how the quilting looks from this side.
It took awhile, but I did find the perfect quilting pattern
Here is a trial run of the quilt hanging in its new spot. It had not been washed yet and the quilting does not show up very well.
Our walls are cinderblock and there is no picture rail here, so a curtain rod is employed

Spotlight highlights the bright colors, patterns, and quilting equally
The can light was already in place before the quilt got hung, but I have to say I'm pretty impressed with how it's centered. It almost looks like it's hanging in a gallery, right? I love how this turned out, every time I look at it I notice something new. Color, pattern, movement... a visual feast.


Saturday, January 6, 2018

Hoodie for Florida


Hoodie in Florida
For this project I followed the Hoodie Pattern and Tutorial from so-sew-easy.com. The fabric and hot pink zipper were from Joann's.

Black, despite looking gray in the picture
Apparently, this is the only picture I took during the construction phase of the project--makes it a bit difficult to go back and post about the process. So, I only have a few notes that I jotted down along the way. 

  • Opted to go without pockets, fabric was a bit puffy anyway
  • Used selvage for the facing on the zipper
  • Original zipper was 24" and ended up getting shortened
  • Hem ribbing cut 40" X 4"
  • Sleeve ribbing cut 9" X 6 3/4 "
  • Hood lining out of same fabric
This hoodie did sew together rather quickly though and I'm happy with the finished fit. I thought a black hoodie would be very versatile, but really it's just a magnet for cat hair.  I am a fan of the pattern though and will undoubtedly use it again.  
Here a few pictures from our recent Florida trip. Temps were in the 40's, so having a hoodie came in handy. It was a bit difficult to photograph with such bright sun, but I'll take sunshine over perfect photos any day.
Next time, hem ribbing will be wider to lengthen the torso

Side view
The raised hood is a domical feature

That pink zipper loves the sun


Saturday, December 30, 2017

Bird Shirt

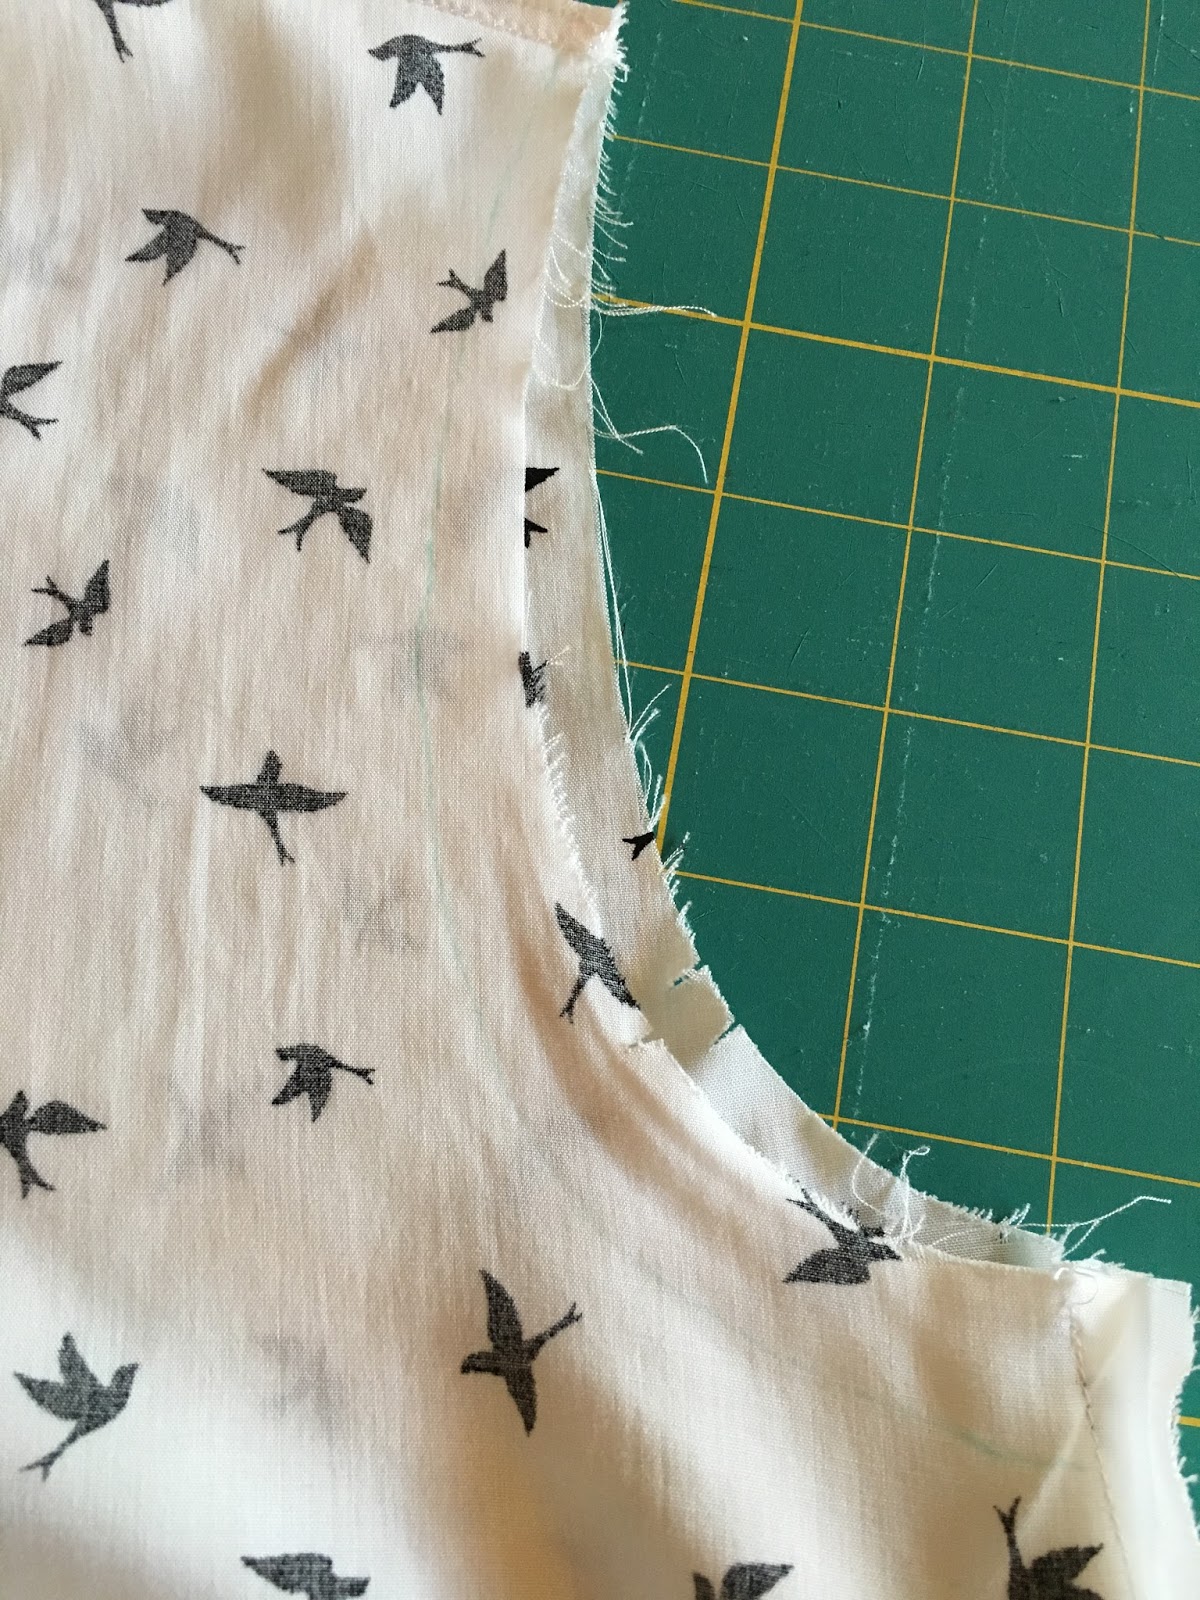
The pattern is New Look 6527 view B and the fabric is from the sale bin at Joann's. Since it was a remnant, there wasn't enough fabric to make even the short sleeves, so I opted to make something I could layer this winter. I cut a size 14 that graded to an 18 below the waist. Next time, I'll start with a 16 on top though, 14 was a bit tight across the shoulders and the armscye was too small. The shirt was quick to cut out, and since the birds were facing all directions I didn't have to worry about matching pattern. I like the neckline on this shirt and it went together smoothly.

Collar before
Collar with iron-on interfacing

Collar after
Next to get sewn on was the bottom half of the shirt.  The fabric is translucent though and the seam across the chest needed to be trimmed to minimize visibility.

Bottom of shirt added, need to trim seam across chest
The next pattern tweak came with the armscye.
Armscye are too small

Green line shows where I resized armholes

Larger armhole
Since there were no sleeves to attach, I finished the sleeve edges at this point and added the shirt hem. My Bernina 1230 handled this lightweight, slightly slippery fabric just fine.
Hem

The finished shirt. I love the birds and I think this will pair with just about any cardigan or sweater.  Since it is a bit see-through and there is no lining, it's probably better that it will get layered.
Front view

Side view: I like the high front-low back hemline 
Back view: still a bit tight across shoulders


Sunday, December 10, 2017

Drunkard's Path Quilt is Finished


She is a showstopper
Last time we checked in on this quilt it was back from being quilted and was waiting for some binding and a good cleaning.

Lainie is inspecting the quilting
 All of the fabrics used in this quilt are at mom's house, so I took my quilt over there a couple weekends ago to piece together the binding. Assembly line style, I cut fabric and mom sewed the strips together. The process went very smoothly--maybe too smoothly as we ended up with 18+ yards of binding for a quilt that only needed 14. No problem, another quilt will come along for which the extras here will make the perfect binding.
18 yards of binding
I had planned to take the quilt back to my place to sew on the binding, but I realized I was going to have to get very creative about space if I did that.  Maybe set up a machine on the dining room table or perhaps the floor so that I would have room to maneuver the quilt next to it? Mom has a beautiful sewing room though and a very large table for her Bernina 1130. She offered to let me sew on binding using that machine and I gratefully accepted.
Look at all that table real estate off to the left
I wanted to keep some of the border that Andrea had sewn on when she did the quilting for a little extra support, so I sewed the binding on where it overlapped the quilt blocks by 1/8" and the white border by 1/8".  Even though the blocks and binding have random pattern placement, there is one place along the edge of the quilt where the same fabric is side-by-side. You probably won't see that unless you know to look for it.
These are not the matching fabrics you are looking for
There was a lot of quilt to maneuver during this process, but the Bernina was more than happy to accommodate and this part of the process proceeded without any hiccups.
Can my arms even reach the machine from here?
The quilt came home and after trimming the border the binding was hand-stitched down. This part of the process took a bit longer that planned. No matter how many times I tried to start working without making any sound I inevitably triggered the innate cat radar that senses warm and comfy napping spots. Both cats would come from the far corners of the house and immediately park themselves on the quilt in my lap. It's very difficult to work with a king size quilt and two cats in your lap.
These little red clips are perfect for holding binding
When Andrea was quilting, she noticed a spot where red dye had spread on the top.  She sent along some Synthrapol to wash the quilt in with the hope of getting the dye out. Here is a before and after of the block with the red dye.  Looks like it all came clean in the wash.

Where did this red dye come from?
Splotch free


The finished quilt on the bed. Sweet dreams.
It's big enough to hang down on both sides and cover the pillows

Update: Andrea showed the quilt in a show in Sun Prairie, WI last weekend. (March 24-26, 2019)