 |
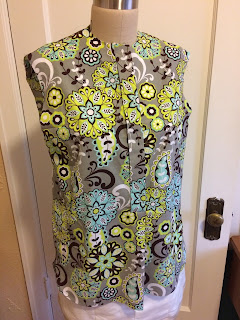
| Calling out to be a shirt |
One of my goals for this summer was to spend more time sewing. Specifically, I wanted to build my skill set in sewing clothes. The first few weeks of summer flew by and I wasn't really able to focus much time on sewing until the last two weeks. Since then, I have completed a bodice sloper, finished piecing a wall quilt, and basted a miniature quilt. I find myself wanting to do something at the sewing machine each day. The most recent project, and the one I am still working on, is a shirt. The pattern is Vogue 1509 and I used some cotton fabric that my friend Jenny gave me a few months ago.
Before cutting out this pattern, I matched up the pieces with the sloper bodice patterns that I had made to see how closely the pattern would fit me. I decided to cut out between size 14 and 16, so I guess it's a self-made size 15? Since the pattern pieces were larger than my sloper at all parts, I knew it would not be skin tight and it was long enough to come below the top of my jeans. One reason for selecting this pattern was that it had sleeves. The bodice sloper I made doesn't have sleeves, so I wanted to see how those would fit in the final pattern.
In putting this shirt together, I have already learned several new-to-me skills and had some practice with others that I hadn't used in awhile.
The first skill involved switching out the foot. I did some edgestitching on the front placket.
 |
| Foot #5 for edgestitching |
 |
| Front placket edgestitched |
Next, I made buttonholes for the first time on my Bernina 1230. I started by just trying to guess how to set up for a buttonhole, you can probably guess how well this worked out. The first time through it only sewed three sides of the buttonhole. It was time to go back to the instruction manual. Careful reading revealed that one needs foot #3A instead of #3 and they look very different.
 |
| Foot #3A trying out various sized buttonholes |
Fortunately, that one was in my accessories box and I quickly made the change. I also changed the bobbin threading so that it went through the little arm hole. After that the buttonholes came out clean and I could make them in various sizes and then copy a selected size multiple times.
 |
| Four finished buttonholes on the shirt |
Hemming was another skill I practiced today. The front and back of this shirt have flat hemlines, but the sides curve up to meet at the side seam. First, I stitched 1/2" from the edge and then folded just over the stitch line and pressed.
 |
| stitched 1/2" from the edge and turned over |
The next step was to trim about 1/8" from the stitch line.
 |
| Trimming |
Then I folded the seam over 1/4 in" and stitched. As you can see, things got a little out of line around the curves, but overall I'm happy with my first try.
 |
| Turned under and stitched |
The back of this shirt has is gathered below the yoke. I hadn't done any gathering in a long time, so mom walked me through that process again. Two basting lines, one other either side of the seam line, and then I pulled the bobbin threads to gather the fabric. The yoke was pinned to the back of the shirt and the gather was spaced between two markers.
 |
| Gather between red circles |
The finished gather looks pretty well centered on the fabric pattern.
 |
| Back gather below yoke |
At this point, I needed a break and a sweet treat. Flourless chocolate cake with cream made a delightful snack. That's real brain food, right?


Starting to look like a real shirt. (And the cake was delicious!)
ReplyDelete