Showing posts with label Jacket. Show all posts

Saturday, December 14, 2019

Blue Knit Jacket


Out in the garden
I'm not sure if this was a 2019 or a 2018 make, and I don't have any pictures from when I sewed it up. When I first made the jacket, it went unworn for a couple months because I thought it was too big. The knit is very stretchy and the fabric drooped more than I was expecting.

I'm not sure what finally made me pull it out of the closet again a couple months ago, but I have found that I actually enjoy the flowy fabric now. It makes a good light-weight layering piece for fall and spring temps and I like that it has no front closures so it hangs open.
Homegrown pumpkins
I'm pretty sure the pattern is a free cardigan pattern I found online, sorry no idea where, that I lengthened. I think I also remember lengthening the sleeves. It seems likely that the fabric is a Joann purchase. This was one of the first projects on a serger and I used the white thread that was already on the machine. That is visible when the jacket hangs open.
There is one place on the inside of one of the front panels where I knicked the fabric when trimming a seam. I ironed on some interfacing and then used a fabric marker to color it blue. It's noticeable from the inside of the garment, but not from the outside. I continue to wear it with this self-created flaw.
Suitable for pumpkin lobbing


Saturday, December 7, 2019

Style Arc Marie Jacket

Marie Jacket
The fabric is a shiny floral ponte from Joann's.  I think I bought it last year and was planning to make a dress, but then decided it would get worn more often as a jacket.

I made this pattern a year ago with purple knit I got from Ginny's in Rochester. That first jacket fit a bit tighter than this version, but I found that I wore it regularly and wanted to try the pattern again. The Style Arc pattern, Marie, is one of mom's and I borrowed it to trace out and sew up a size 14. The first time I made this jacket, I had trouble following the sewing directions and I ended up making myself a post-it note with reminders on it in case I used the pattern again. These reminders came from blogs and pattern reviews that I had read while researching this pattern and from my own errors while assembling the jacket the first time. For example, I remember having to take out and reset the zipper on the first jacket and then deciding it was just going to stay 'a bit wrong' after the second attempt.  The notes were handy the second time around and I was glad I had taken time to write then down.

The sleeves on my original jacket were too short, so I lengthened them 2" before cutting this time. That's the only change I made to the pattern. I didn't have quite enough of the floral ponte, so I had to get creative with the layout. One of the back pieces has part of the selvedge in it and that's visible along the center back seam. Not a worry for me though, it just ensures that no one else will have a jacket like mine. I also made no attempt at pattern alignment. There was little-to-no spacing between pattern pieces so flower placement was not a consideration.
It was a tight fit with the pattern pieces
I used my Bernina 1230 and my Bernette 34D serger to sew this jacket. The sewing machine had navy thread and the serger had black thread. Both machines handled the fabric well.
Serged yoke and center back seam
Top-stitched yoke seam
The zipper is from Vogue Fabrics. I had cut out the jacket and was already sewing it together when I realized I didn't have a compatible zipper. My only options at home were short invisible zippers or a white separating zipper. Vogue does not keep a very wide selection of zippers in their Evanston store these days. The pattern called for a 17" separating zipper, but I went with a navy blue 18" as it was the only one I could find. Knowing that I had to do the zipper twice on my first jacket, I took extra time to set this one in and I'm pleased with how it turned out. It is top-stitched to hold the seam flat.

One note I gave myself last time was to set the sleeves in flat and I did that again this time. They went in easily and those seams were finished with the serger. I think this helps avoid extra bulk around the shoulders and under the arms. Another note I had was to make sure the zipper did not extend into the hem and I double-checked the placement before sewing in the facing.
Facing on the neckline
Before side and sleeve seams are in
After sewing in the facing, I flipped it right-side out to check flower placement.  It looked like the two big pink flowers would be in the center, not on my chest, so I was happy with that placement.

Back and sleeve length are good
I have worn this jacket several times already and never got around to putting in a snap or hook and eye inside to hold the flap under the zipper closed. Currently, a safety pin is employed when needed and I'm not in a hurry to upgrade that fastener.
Hangs nicely when front is left open
Back seam is visible with selvedge
This is a very comfortable top and I'm sure I will make it again with other fabrics.


Saturday, November 30, 2019

Another Tamarack Jacket

Tamarack Jacket
I'm fairly certain this gray and black geometric pattern fabric came from Ginny's Fine Fabrics a few years ago. Since then though, I lost my online fabric stash record so I can't check the details. The other possibility is that it came from Treadle Yard Goods. Either way, I had about 3 1/2 yards and that was enough to try making a longer version of the Tamarack Jacket from Grainline Studio. For the lining, I used a paisley that came from Joann sale rack. It was one of the few slippery fabrics I had enough of to use for a lining.
Cutting out the gray fabric was easy, but the paisley took quite a bit of time. It was so very slippery and it frayed as soon as it was cut.
You can see the 3 inches I added to the length of the coat
Once the jacket and the lining pieces were cut, I sandwiched cotton batting in between the layers. All the layers were hand-basted together to minimize slippage during quilting.
Basting jacket back to the batting
Trimming around basted layers
Next, the back, front sides, and sleeves all got quilted. The pattern was drawn on with a chalk pencil and the Bernina 1230 with its walking foot did all the stitching.

Top half of coat front has vertical lines, the rest has diagonal lines
Quilting on back
Tops of sleeves also have vertical lines
Lining crinkles noticeable with quilting
After quilting, the front and back were sewn together, sides seams were finished, and sleeves were inserted. Most seams were finished with the serger in the hopes of forcing the fraying lining into submission. Serging helped, but there were parts where the lining had slipped so much during quilting that it no longer fit into the seam allowance. There are a couple places that didn't get caught by the serger and I went back and tacked the lining in those areas down by hand. Once it was sewn together, the jacket hung on the dress form for a few days while I considered binding options. I wanted solid black and was planning to drive out to the quilt store in Arlington Hts for some black Kona cotton, but then remembered that I had some leftover cotton twill that I had been using for trouser muslins this summer. I cut that into 2" strips and used that for binding.

Making binding on the Bernina 1230
The binding goes all the way around the front opening, neckline, hem, and sleeve openings of the coat.
Basting still holds layers together until binding is done
Mitered corners for the binding
Binding finished by hand even around tricky curves
The front welt pockets were intentionally left out. Since I intend to wear this jacket with jeans or dress pants I will already have access to pockets.
Awaiting sleeve binding
The jacket pattern does not include a front closure and I debated whether I wanted to add one. Looking through my stash, I stumbled upon a frog closure. I don't know how or when this joined my stash, but it was a perfect fit for this project. 
Single frog closure
After settling on placement, I attached the frog closure by hand.
Frog closure
Before wearing and photographing the finished jacket, it was machine washed in cold water to erase the chalk quilting lines.

The following pictures, and the first one in this post, were all taken by my sister-in-law, Victoria. She graciously agreed to photograph a couple of my finished projects recently and she has single-handedly upgraded the photo quality on this blog. Heretofore I was taking selfies or mis-managing the timer and settling for some crazy shots. It was a relief this time to not have to worry about accidentally cutting parts of me out of the shot, wardrobe malfunctions, photo-bombers, or blurry pics. Victoria also edited her photos to showcase the details of the finished coat. This will encourage me to up my sewing/finishing skills so future finished projects are indeed camera worthy. Thank you, Victoria.

Black trim sets off fabric nicely
Added sleeve and coat length are appreciated
Fantastic pop of color on the inside
Side seam serged to help control fraying in the lining
The curves in the hem make this coat a bit dressier
Pleased with my coat and the pictures

Sunday, August 18, 2019

Tamarack Jacket Wearable Muslin

Tamarack Jacket in August
This jacket was made last November, but I haven't posted about it. Here's what I remember about the construction.
The cream exterior fabric is from a bag of scraps picked up from Freecycle. I don't know what the fabric content is, but it feels like something you would use for curtains or curtain lining. It has a bit of a waffle texture and seems to hold its shape pretty well. The lining is a piece of drapery fabric that Emily gave me at work.
Stewie approves cream fabric
This was my first attempt at making any sort of jacket or coat. The pattern is the Tamarack Jacket from Grainline Studio. I traced a size 16 except where I narrowed to a size 14 under the armscye down to the waist. The torso and sleeves were both lengthened 2 inches.
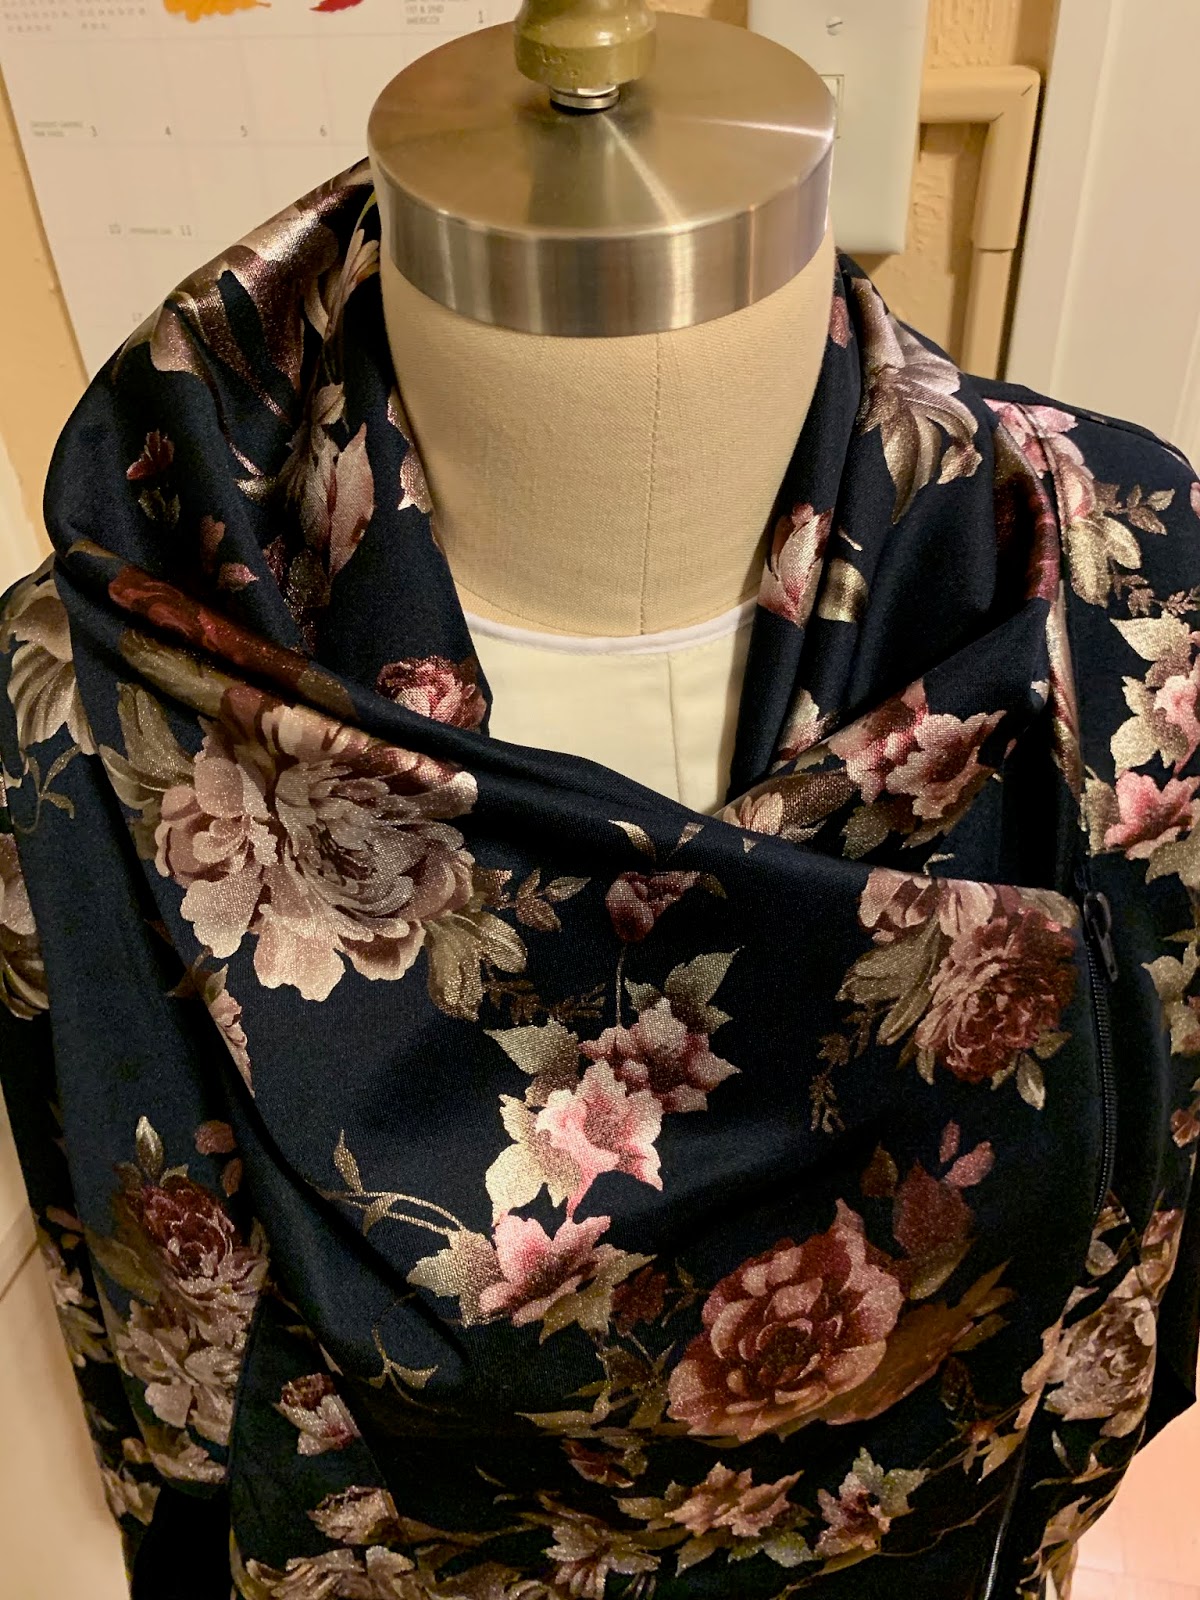
Floral lining for the sleeves
Cutting batting for back
For quilting the layers together, I used the walking foot on my Bernina 730 Record and evenly spaced horizontal rows. I could see where there are endless possibilities for quilting here, but I kept it basic for this first jacket.
Basted in reference lines for quilting
Quilting a sleeve
The seams in this muslin are not finished and I will definitely want to finish them on the next coat. There is fraying fabric and batting that I will not put up with next time.

Welt pockets were new for me and I watched a couple videos online, consulted a few sewing reference books, and followed the Tamarack Jacket sew-along instructions that Graineline Studio provided. I think they turned out well as viewed from the front, but the pocket lining is unfinished and I think it needs to be anchored to the inside of the jacket.
Floral pocket lining
At one point I really thought I had inserted the pocket flap upside down. I was sure that the flap should be hanging down from the top over the pocket opening. Since it was a muslin, I wasn't planning to go back and change that, but I did spend time rereading the directions and consulting the Grainline Studio sew-along to see what I would need to change for next time. It was in the sew-along that I realized the pocket wasn't constructed incorrectly, it just wasn't finished yet. The loose flap needed to be hand-stitched on the ends and secured to the front of the coat
I thought I had erred in my pocket construction, still need to attach flap
For the bias binding I used denim. The neckline and front opening of the jacket are selvedge and the jacket hem and sleeves are pieced denim strips.
Raw selvedge look adds great texture
Bias binding on front and bottom hem, one sleeve attached
Hook and eye fasteners were used for the front. I don't like how there are distinct gaps and spaces between the fasteners and I probably won't use those for the next jacket. I did see a tutorial for a zipper front somewhere in my research, I think I'd like to try that next time.
Denim pops against white 
I like the different lengths in front and back
Pocket linings inside out
The finished jacket looks pretty good from the outside, but is a bit messy inside. It's also a bit big across the shoulders. The light color exterior quilted in rows gives it a distinct Michelin Tire Man look. Before I make my first fashion fabric coat, I'll trace a smaller, size 14.
Increased sleeve length is good
Maybe make pockets a bit deeper


Still don't like gaps between hook and eyes on front
Good length in back