Wednesday, December 28, 2016

Necchi BU Mira Update and First Project

I'm posting this update fast on the heels of my introduction for this machine.  I may have forgotten to actually post the intro a few months ago and just came across it when I started writing this update. Ah well, this will minimize any feelings of suspense you had about how this machine would turn out.
I started by cleaning the machine inside and out. I really wanted to get as much of the oil residue off as I could, and the chrome polished up nicely.  Next, I tackled the crumbling wires that attached to the motor.
Old wires
I took the motor bracket off the machine and then took the motor out of the bracket.
Wires coming up through bed of machine

White caulk extends around side of machine
The wires coming up through the bed of the machine had no insulation left on them.  There was a white putty substance that crumbled easily and then a line of white 'caulk' that went around the side of the machine.  All of the connections inside the box looked good, so I just planned to swap out the wires with crumbling insulation.

Take that gray wire out
A trip to the Goodwill for a power cord and to the hardware store for eyelets and then I was ready to go.  Once I got started, the process didn't take very long and I had a working motor upon completion.


From then on it was attention to detail that got this girl looking her absolute best. Here she is ready to take on her first quilting project.  I do not have a cabinet for her right now, but I will keep looking for one because she wandered a bit while sewing on this table.
She is beautiful!

There are a few marks on her paint, but she has aged well. 
Oil residue spots are minimized
After tension discs were cleaned, she threaded up easily

There is no crumbling insulation on that power cord

The needle plate has some rust that I couldn't get off, but it sanded to a pretty smooth surface

I took the wonder wheel off the machine for now.  I will need to replace the tire and find one missing part before I try it out.

The light works
 The first project I worked on with Mira was piecing a baby quilt.  This one was made from a jelly roll of Moda fabrics.
Assembly line piecing
Here is the finished top waiting for a backing
I loved sewing with this machine.  There was not one time that the thread or needle jammed up.  I was able to figure out the bobbin winder without the manual, and I like the sound the machine makes when it's working.  The machine feels like it has more power than was needed for this project and I'll have to figure out another way to put her through her paces.

Necchi BU Mira

This machine was a gift that I bought for myself while on a girls' weekend in Wisconsin.  My college roommate and I met in Milwaukee this summer for a couple days of fun.  We checked out the Schlitz Audubon Society, Havenwoods State Forest, and great restaurants.  J, what do you say, shall we do it again next summer?  On the first day I got to the hotel a bit early so I made a quick side trip down the street to the Goodwill.  There was only one machine in the whole place, but I was completely taken with it.  The machine was hidden in a broken cabinet in the back of the store surrounded by furniture and buried under some boxes.  I almost walked right by it, but the type of legs on the cabinet spurred me to take a closer look.  Inside the cabinet I found the discolored and somewhat worn BU Mira. The hand wheel would barely turn, but the wiring was crumbling and I didn't want to plug it in to try it out. Near the hand wheel was an attachment that I did not recognize and I guessed it was a wonder wheel. There was a small box of accessories and three discs for the wonder wheel in the door of the cabinet, and I practically ran up to the counter to purchase all of it.  I spent the next few days hauling a sewing machine and cabinet in the back of my car everywhere we went.  I was tempted to carry it into the hotel one night so I could look at it, but my friend gave me the 'you might be a bit too crazy' look, so the machine stayed in my car until I got back to Chicago.
When I finally got home, I took the machine out of the crumbling cabinet and threw the cabinet away.
The lighting is a bit dark in the garage

Top view: Lots of oil residue discoloring the paint

The bed looks to be in pretty good condition
  The tire for the wonder wheel and the bobbin winder need to be replaced

The belt looks to be in good shape

There a good collection of lint and such behind the faceplate

Handy panel for access to innards
You can see some wear on the side of the bed--maybe from the cabinet

Oil ports keep out dust, but have accumulated a residue around them over time

Some paint worn off on the bed and body

I did not get a manual with this machine, so I had to go online and do a bit of reading before I started cleaning her up.  This machine is from the early 1950's.  The Mira is a top-of-the-line Necchi and it will sew straight stitch, zig-zag, and reverse.  The wonder wheel allows the machine to do a few decorative stitches, but I don't think that I have all the pieces for this wheel right now.  The motor has two speeds, high and low, with a switch on the back.  There is also a built-in light. Since the wiring is crumbling, I did not try to see if the light works. The box of accessories came with a few class 15 bobbins, two needle plates, several different feet, an automatic threader, and what I am hoping are the wonder wheel rods. 
The plan was to have this machine working by Christmas.

Friday, December 23, 2016

Crushed Red Velvet Shirt

Just in time for the holiday, I finished my red velvet shirt.  I started with the pattern from my 70's vibe dress and just shortened it about 4 inches.  Now I'm thinking I should have added a couple more inches to the arm length and lowered the neckline a bit, but overall I'm pleased with how it turned out.  The fabric was another Salvation Army scrap.  The shoulder and side seams were done on my Necchi Supernova Ultra Mark II and the hem, neckline, and sleeve finishes were done by hand. Cutting the fabric was very messy, but the pieces then went together very quickly.  The fabric is a bit stretchy, so it was forgiving with some of my errant hem stitches.
I wore the shirt to work yesterday and then out to dinner afterwards.  These pictures were snapped quickly near our table while we waited for our food.  The lighting is terrible and I put very little forethought into picture composition, but here are a couple pics to show the finished shirt.
Festive red
Front neckline is a bit high


Contemplating the next project

Sunday, December 18, 2016

Singer Genie 353


This was a present from a coworker during parent-teacher conferences before Thanksgiving break.  I walked in to find this on one of the tables in my classroom and it was all I could do not to play with it instead of doing conferences.  Instead of throwing it away, my coworker offered it to me when it stopped sewing. I'm so glad she thought of me and sent the machine my way.  I welcome any machine in any condition--I can learn something from each one of them.
This was my first Singer Genie 353 and it came with the foot controller, but was missing a bobbin, manual, and accessories.  The handwheel turned very hard and it sounded like it was going to need some good lubrication.  My coworker indicated that there was a problem with the needle function and it wasn't forming stitches, but that's all the info I got.  No problem, I'll put on my detective hat.
The machine is much lighter than many I work on, and it tucked away neatly into a compact carrying case.  The machine, foot controller, and accessories (if I had any) are all contained in this box.  When you push on button above the Singer logo on the left, the front panel folds down and then the front, left, and side panels slide off.  Contained within the portion that slides off are spaces for the foot controller and accessories.  There is also a threading diagram inside the back panel.
You don't rub a lamp to free this Genie

Threading diagram
After taking off the case, I removed back and side panel of the machine.  After cleaning those areas out, I took the four screws off the bottom and accessed the bottom of the machine through the removable tray.

Inside of machine before I cleaned it out
There was a lot of lint built up and the grease had all dried up and discolored.  It took a lot of q-tips and patience to clean off the old lubricant.  There didn't appear to be any damage though after putting in some Tri-Flow, things started moving smoothly.  Both belts needed lint cleaned out of them, but then the handwheel turned easier and quieter.
When I got it all put back together I checked the hook, feed dog, and needle bar timing.  None needed adjustment.  I put in a new needle and found a class 66 bobbin.  The bobbin winder is on top of the machine and when I initiated the bobbin-winder setting on the handwheel it wound without any problem.
Handwheel with bobbin-winder setting

New bobbin fits well
I didn't know what to expect with my test stitches.  Last I heard this machine didn't sew, but everything was looking so good now.  When I started her up, she didn't even hesitate.  I had to adjust tension a bit, but straight stitch, zig-zag, blind hem and reverse all worked.  I'll have to figure out a project that will really put this machine through its paces, but I'm thrilled to have it working.  Not every machine can be saved from the garbage, but I do love having the chance to try.  

Saturday, December 10, 2016

Shirt of Many Colors


This shirt is so wonderfully soft and comfy.  I may end up making several more.  The pattern is McCall's 7195 style B and I picked both the pattern and the fabric on sale at Joann's.  I made the pattern as-is and the sleeves are a great length, but I think I'll add an inch or two to the torso next time. When I originally bought this fabric I was planning to use my 'new-to-me' serger. Unfortunately, two of the tension knobs are broken and after taking it to Ray White's class last month, I found out it can't be fixed.  I never even got to try it out.  Fortunately,  I have a couple sewing machines that could step in and handle this project.  I decided to use my Necchi Supernova.
This machine was rescued from a pile of rubbish curbside and it took awhile to get her going again, but I could tell she was longing to take on a new project.  I had just installed the pink beauty in table with a knee controller and I think she liked having a place to call home.  
Necchi Supernova

In her new table
I spread out on the kitchen floor to do my cutting.  There is a repeating pattern on this fabric, and I wanted to try to get things centered.  It looks like chaos, but I really was able to get the pieces lined up as I'd hoped.


Lots of color in this fabric

Cutting out on kitchen floor
When I started sewing, I just had to move back and forth from the kitchen floor to the dining room where the sewing machine was.  Sometimes these work spaces seem too far away, but it does force me to get up and stretch my legs and regular intervals.
Neckline finished, time for sleeves
Hem by hand
I could have hemmed this on the machine, but I find that for now I do like the process of putting in a hem by hand.
Front view on dress form
Back view

Side view
Back

Side, still with the glasses glare

Sunday, December 4, 2016

Singer 201 Update and Questions

In hindsight, I probably should have suspected that there would be problems.  The Singer 201 I photographed a couple weeks ago did show some rust, had a frozen hand wheel, needed new wiring, and was missing a foot control and plug, but I still thought she could be cleaned up and doctored a bit and would be sewing again soon.  I had high hopes.
My first clue should have been the rust on the potted motor casing.  I knew I was going to have to clean the motor, but I was ready to take that on.  As I began to take apart the machine I used The Vintage Singer Sewing Machines Blog's series on How to Rewire a Potted Motor as a reference.  This is an amazing collection of pictures, videos, explanations and sequential postings that completely documents the process.  Rain has produced a top-notch series here and his responses to questions posted by readers demonstrate such clarity and depth of understanding.  Thank you, Rain, for such a thorough resource.
Rust on the motor casing: should have been a clue
I started by accessing the motor leads in the terminal body.  This machine did not have a plug, so I did not have to worry about unplugging the power source first.  Some of the wire coverings were dry and cracked and they need to be replaced, but there was no sign of moisture and it was easy to disconnect the motor leads.
Everything looked dry--nothing beyond repair, yet
Next, I removed the handwheel so I could access the motor housing. 
The handwheel came off easily, but was clearly going to need a good cleaning
The motor housing after handwheel was removed
The motor housing needs a good cleaning to get out the old grease, but this still seems a doable task.  I should have probably paid a bit more attention the the rust on the motor at the side of this pic.  After cleaning out the housing, I removed it and the motor. 
Motor housing has been removed
Bobbin-winder comes with the housing
Next, I removed the grease wicks, retaining clips, and springs.  The clips and springs were set to soak in alcohol. 
Moving on, I tried to take out the motor brushes, but only the spring came out without the brush attached.  There was some buildup under the motor caps.  Things started to take a significant turn for the worse when I tried to unscrew the motor cover.  Those screws were rusted solid and had no intention of coming loose.  I mean, really, just getting those screws loose probably took me 20 minutes.  When I finally went to pry the cover off it also appeared rusted in place.  Rain has a great photo on his blog about what I was should have (was hoping) to see when I took off the cover. You can see the picture here.  This is what I found instead.
Game over
That's a lot of rust and crud.  I don't think she can be resurrected.  Going to have to let this one go. Just because I could though, I decided to keep dismantling the motor while I had it there.  I took out the worm and that seemed be in very good shape.  Then I took out the armature and that was in a sorry state.  I mean, can you even tell where the metal plates are that you are supposed to be able to use to hold the armature?  Now I've got a parts graveyard on my table.  If anyone needs retaining clips, springs, grease caps, etc. let me know.
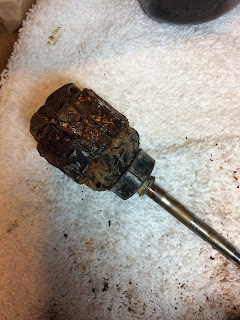
Armature caked in crud
Inside of the motor minus the armature
Ok, so this motor is not salvageable but I can still get the machine working, right?  What is my next step?  I know it needs new wiring and I have to get the handwheel unfrozen, but what options for power do I have?   Can I get a new motor or should I think about converting the machine to a treadle? I have never sewn on a Singer 201 and liked the idea of having a motor, but I don't know if that's possible at this point.  Any suggestions?